前言
Flink是大数据处理领域一款开源的分布式、高性能的流式处理框架,它提供了一系列优雅的技术,实现对数据的毫秒级处理。本文以一个来自官网的WordCount例子为引,简单阐述flink的核心架构及执行流程,希望读者可以借此更加深入的理解Flink逻辑。
本文跳过了一些基本概念,如果对相关概念感到迷惑,请参考官网文档。另外在本文写作过程中,Flink正式发布了其1.5 RELEASE版本,在其发布之后完成的内容将按照1.5的实现来组织。
从 Hello,World WordCount开始
首先,我们把WordCount的例子再放一遍:
1 | public class SocketTextStreamWordCount { |
首先从命令行中获取socket对端的ip和端口,然后启动一个执行环境,从socket中读取数据,split成单个单词的流,并按单词进行总和的计数,最后打印出来。这个例子相信接触过大数据计算或者函数式编程的人都能看懂,就不过多解释了。
flink执行环境
程序的启动,从这句开始: final StreamExecutionEnvironment env = StreamExecutionEnvironment.getExecutionEnvironment() 。
这行代码会返回一个可用的执行环境。执行环境是整个flink程序执行的上下文,记录了相关配置(如并行度等),并提供了一系列方法,如读取输入流的方法,以及真正开始运行整个代码的execute方法等。对于分布式流处理程序来说,我们在代码中定义的flatMap,keyBy等等操作,事实上可以理解为一种声明,告诉整个程序我们采用了什么样的算子,而真正开启计算的代码不在此处。由于我们是在本地运行flink程序,因此这行代码会返回一个LocalStreamEnvironment,最后我们要调用它的execute方法来开启真正的任务。我们先接着往下看。
算子(Operator)的注册(声明)
我们以flatMap为例,text.flatMap(new LineSplitter()) 这一句话跟踪进去是这样的:
1 | public <R> SingleOutputStreamOperator<R> flatMap(FlatMapFunction<T, R> flatMapper) { |
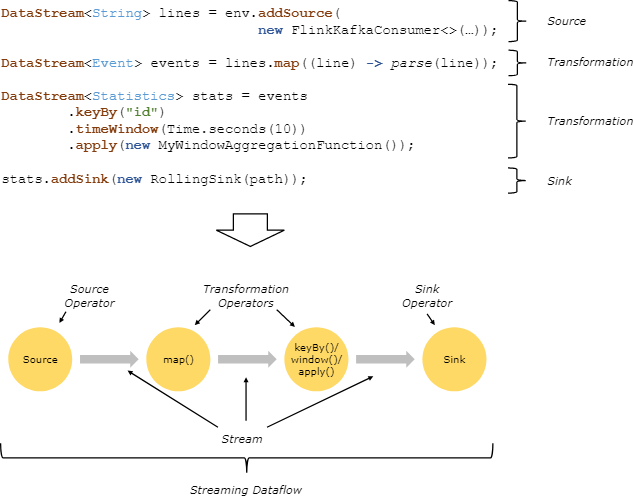
里面完成了两件事,一是用反射拿到了flatMap算子的输出类型,二是生成了一个Operator。flink流式计算的核心概念,就是将数据从输入流一个个传递给Operator进行链式处理,最后交给输出流的过程。对数据的每一次处理在逻辑上成为一个operator,并且为了本地化处理的效率起见,operator之间也可以串成一个chain一起处理(可以参考责任链模式帮助理解)。下面这张图表明了flink是如何看待用户的处理流程的:抽象化为一系列operator,以source开始,以sink结尾,中间的operator做的操作叫做transform,并且可以把几个操作串在一起执行。
我们也可以更改flink的设置,要求它不要对某个操作进行chain处理,或者从某个操作开启一个新chain等。
上面代码中的最后一行transform方法的作用是返回一个SingleOutputStreamOperator,它继承了Datastream类并且定义了一些辅助方法,方便对流的操作。在返回之前,transform方法还把它注册到了执行环境中(后面生成执行图的时候还会用到它)。其他的操作,包括keyBy,sum和print,都只是不同的算子,在这里出现都是一样的效果,即生成一个operator并注册给执行环境用于生成DAG。
程序的执行
程序执行即 env.execute("Java WordCount from SocketTextStream Example") 这行代码。
本地模式下的execute方法
这行代码主要做了以下事情:
- 生成StreamGraph。代表程序的拓扑结构,是从用户代码直接生成的图。
- 生成JobGraph。这个图是要交给flink去生成task的图。
- 生成一系列配置
- 将JobGraph和配置交给flink集群去运行。如果不是本地运行的话,还会把jar文件通过网络发给其他节点。
- 以本地模式运行的话,可以看到启动过程,如启动性能度量、web模块、JobManager、ResourceManager、taskManager等等
- 启动任务。值得一提的是在启动任务之前,先启动了一个用户类加载器,这个类加载器可以用来做一些在运行时动态加载类的工作。
远程模式(RemoteEnvironment)的execute方法
远程模式的程序执行更加有趣一点。第一步仍然是获取StreamGraph,然后调用executeRemotely方法进行远程执行。
该方法首先创建一个用户代码加载器
1 | ClassLoader usercodeClassLoader = JobWithJars.buildUserCodeClassLoader(jarFiles, globalClasspaths, getClass().getClassLoader()); |
然后创建一系列配置,交给Client对象。Client这个词有意思,看见它就知道这里绝对是跟远程集群打交道的客户端。
1 | ClusterClient client; |
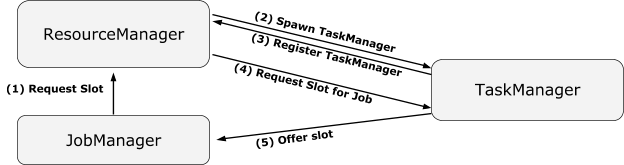
client的run方法首先生成一个JobGraph,然后将其传递给JobClient。关于Client、JobClient、JobManager到底谁管谁,可以看这张图:

确切的说,JobClient负责以异步的方式和JobManager通信(Actor是scala的异步模块),具体的通信任务由JobClientActor完成。相对应的,JobManager的通信任务也由一个Actor完成。
1 | JobListeningContext jobListeningContext = submitJob( |
可以看到,该方法阻塞在awaitJobResult方法上,并最终返回了一个JobListeningContext,透过这个Context可以得到程序运行的状态和结果。
程序启动过程
上面提到,整个程序真正意义上开始执行,是这里:
env.execute("Java WordCount from SocketTextStream Example");
远程模式和本地模式有一点不同,我们先按本地模式来调试。
我们跟进源码,(在本地调试模式下)会启动一个miniCluster,然后开始执行代码:
1 | // LocalStreamEnvironment.java |
这个方法里有一部分逻辑是与生成图结构相关的,我们放在第二章里讲;现在我们先接着往里跟:
1 | //MiniCluster.java |
正如我在注释里写的,这一段代码核心逻辑就是调用那个 submitJob 方法。那么我们再接着看这个方法:
1 | public CompletableFuture<JobSubmissionResult> submitJob(JobGraph jobGraph) { |
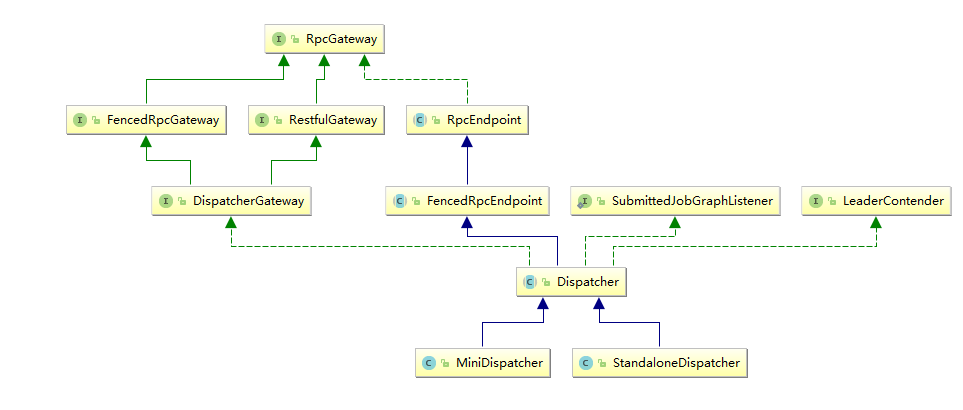
这里的 Dispatcher 是一个接收job,然后指派JobMaster去启动任务的类,我们可以看看它的类结构,有两个实现。在本地环境下启动的是 MiniDispatcher ,在集群上提交任务时,集群上启动的是 StandaloneDispatcher 。
那么这个Dispatcher又做了什么呢?它启动了一个 JobManagerRunner (这里我要吐槽Flink的命名,这个东西应该叫做JobMasterRunner才对,flink里的JobMaster和JobManager不是一个东西),委托JobManagerRunner去启动该Job的 JobMaster 。我们看一下对应的代码:
1 | //jobManagerRunner.java |
然后,JobMaster经过了一堆方法嵌套之后,执行到了这里:
1 | private void scheduleExecutionGraph() { |
我们知道,flink的框架里有三层图结构,其中ExecutionGraph就是真正被执行的那一层,所以到这里为止,一个任务从提交到真正执行的流程就走完了,我们再回顾一下(顺便提一下远程提交时的流程区别):
- 客户端代码的execute方法执行;
- 本地环境下,MiniCluster完成了大部分任务,直接把任务委派给了MiniDispatcher;
- 远程环境下,启动了一个
RestClusterClient,这个类会以HTTP Rest的方式把用户代码提交到集群上; - 远程环境下,请求发到集群上之后,必然有个handler去处理,在这里是
JobSubmitHandler。这个类接手了请求后,委派StandaloneDispatcher启动job,到这里之后,本地提交和远程提交的逻辑往后又统一了; - Dispatcher接手job之后,会实例化一个
JobManagerRunner,然后用这个runner启动job; - JobManagerRunner接下来把job交给了
JobMaster去处理; - JobMaster使用
ExecutionGraph的方法启动了整个执行图;整个任务就启动起来了。
至此,第一部分就讲完了。
理解flink的图结构
第一部分讲到,我们的主函数最后一项任务就是生成StreamGraph,然后生成JobGraph,然后以此开始调度任务运行,所以接下来我们从这里入手,继续探索flink。
flink的三层图结构
事实上,flink总共提供了三种图的抽象,我们前面已经提到了StreamGraph和JobGraph,还有一种是ExecutionGraph,是用于调度的基本数据结构。
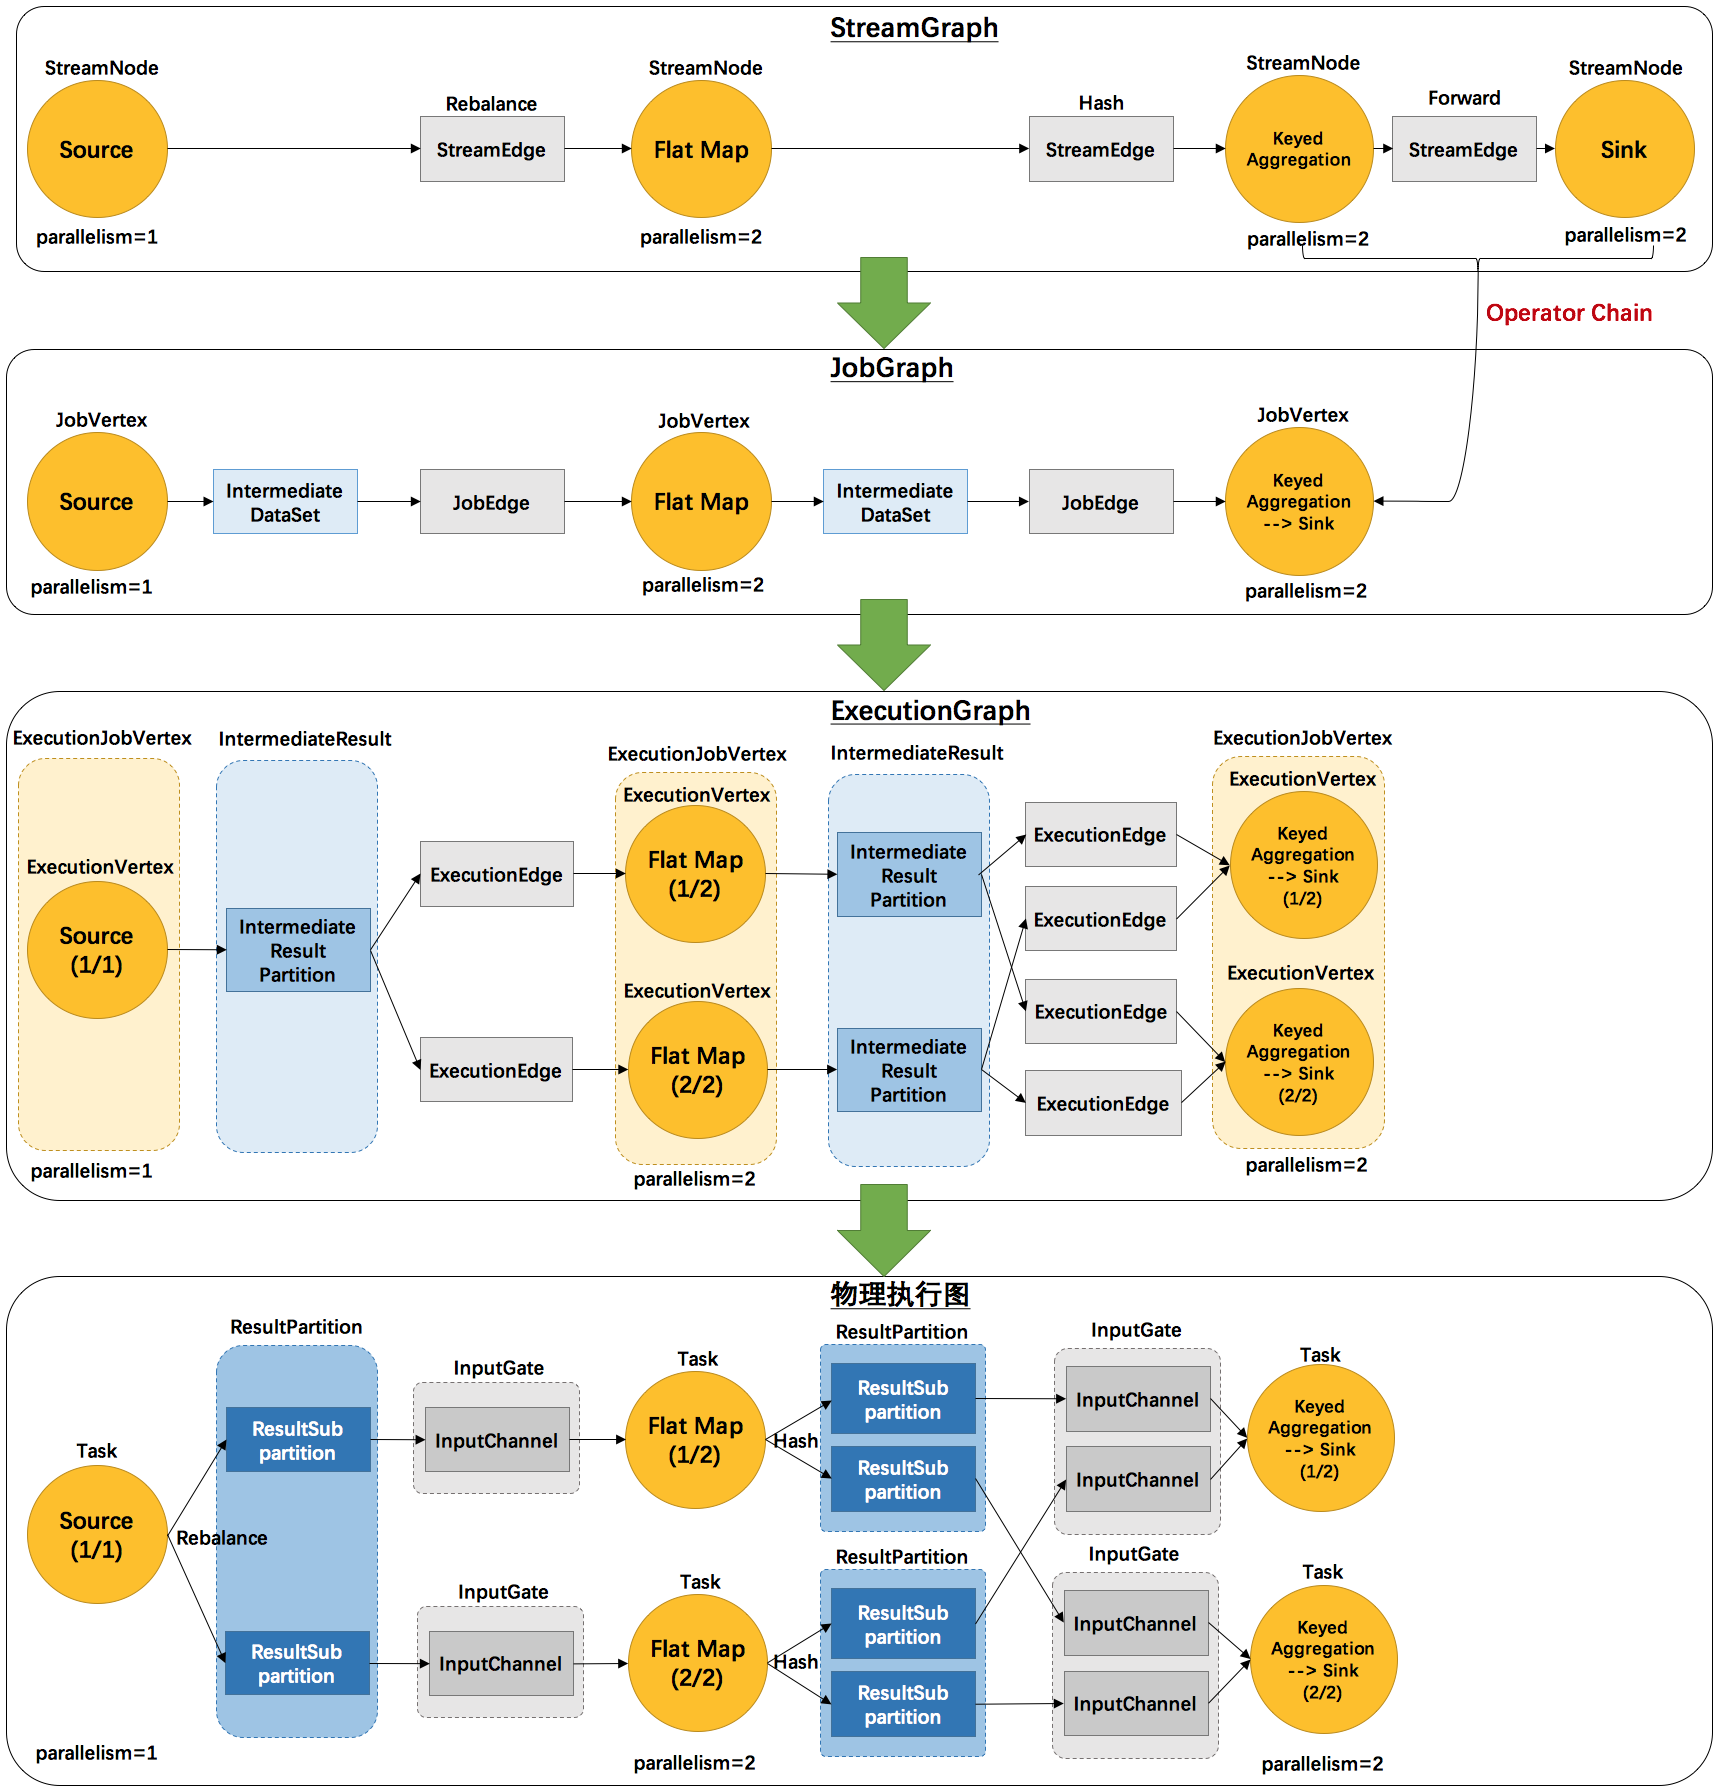
上面这张图清晰的给出了flink各个图的工作原理和转换过程。其中最后一个物理执行图并非flink的数据结构,而是程序开始执行后,各个task分布在不同的节点上,所形成的物理上的关系表示。
- 从JobGraph的图里可以看到,数据从上一个operator流到下一个operator的过程中,上游作为生产者提供了IntermediateDataSet,而下游作为消费者需要JobEdge。事实上,JobEdge是一个通信管道,连接了上游生产的dataset和下游的JobVertex节点。
在JobGraph转换到ExecutionGraph的过程中,主要发生了以下转变:
- 加入了并行度的概念,成为真正可调度的图结构
- 生成了与JobVertex对应的ExecutionJobVertex,ExecutionVertex,与IntermediateDataSet对应的IntermediateResult和IntermediateResultPartition等,并行将通过这些类实现
ExecutionGraph已经可以用于调度任务。我们可以看到,flink根据该图生成了一一对应的Task,每个task对应一个ExecutionGraph的一个Execution。Task用InputGate、InputChannel和ResultPartition对应了上面图中的IntermediateResult和ExecutionEdge。
那么,flink抽象出这三层图结构,四层执行逻辑的意义是什么呢?
StreamGraph是对用户逻辑的映射。JobGraph在此基础上进行了一些优化,比如把一部分操作串成chain以提高效率。ExecutionGraph是为了调度存在的,加入了并行处理的概念。而在此基础上真正执行的是Task及其相关结构。
StreamGraph的生成
在第一节的算子注册部分,我们可以看到,flink把每一个算子transform成一个对流的转换(比如上文中返回的SingleOutputStreamOperator是一个DataStream的子类),并且注册到执行环境中,用于生成StreamGraph。实际生成StreamGraph的入口是 StreamGraphGenerator.generate(env, transformations) 其中的transformations是一个list,里面记录的就是我们在transform方法中放进来的算子。
StreamTransformation类代表了流的转换
StreamTransformation代表了从一个或多个DataStream生成新DataStream的操作。顺便,DataStream类在内部组合了一个StreamTransformation类,实际的转换操作均通过该类完成。
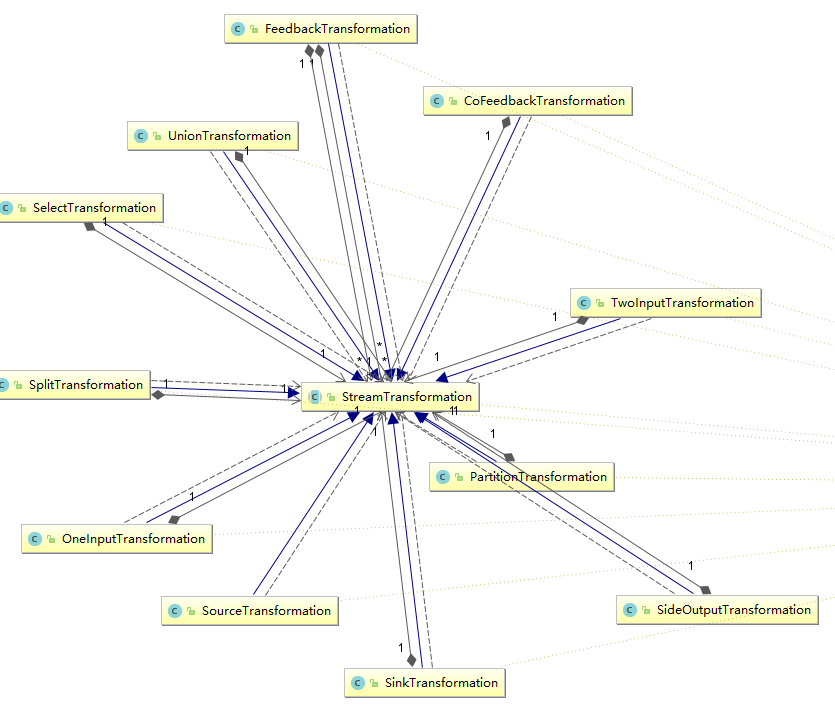
我们可以看到,从source到各种map,union再到sink操作全部被映射成了StreamTransformation。
其映射过程如下所示:
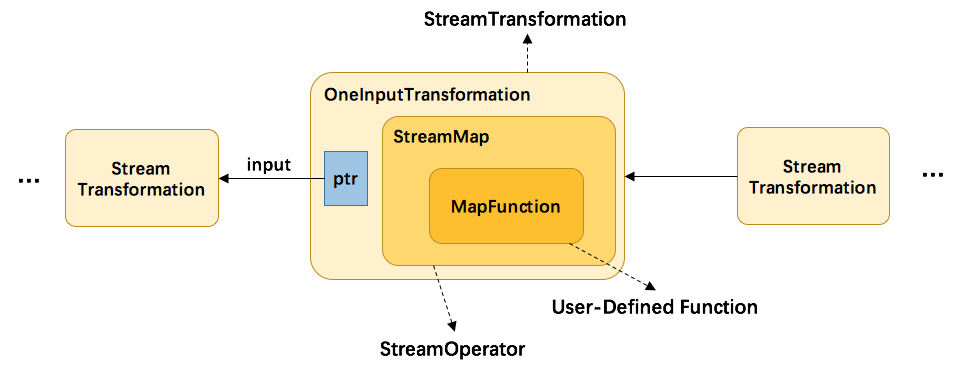
以MapFunction为例:
- 首先,用户代码里定义的UDF会被当作其基类对待,然后交给StreamMap这个operator做进一步包装。事实上,每一个Transformation都对应了一个StreamOperator。
- 由于map这个操作只接受一个输入,所以再被进一步包装为OneInputTransformation。
最后,将该transformation注册到执行环境中,当执行上文提到的generate方法时,生成StreamGraph图结构。
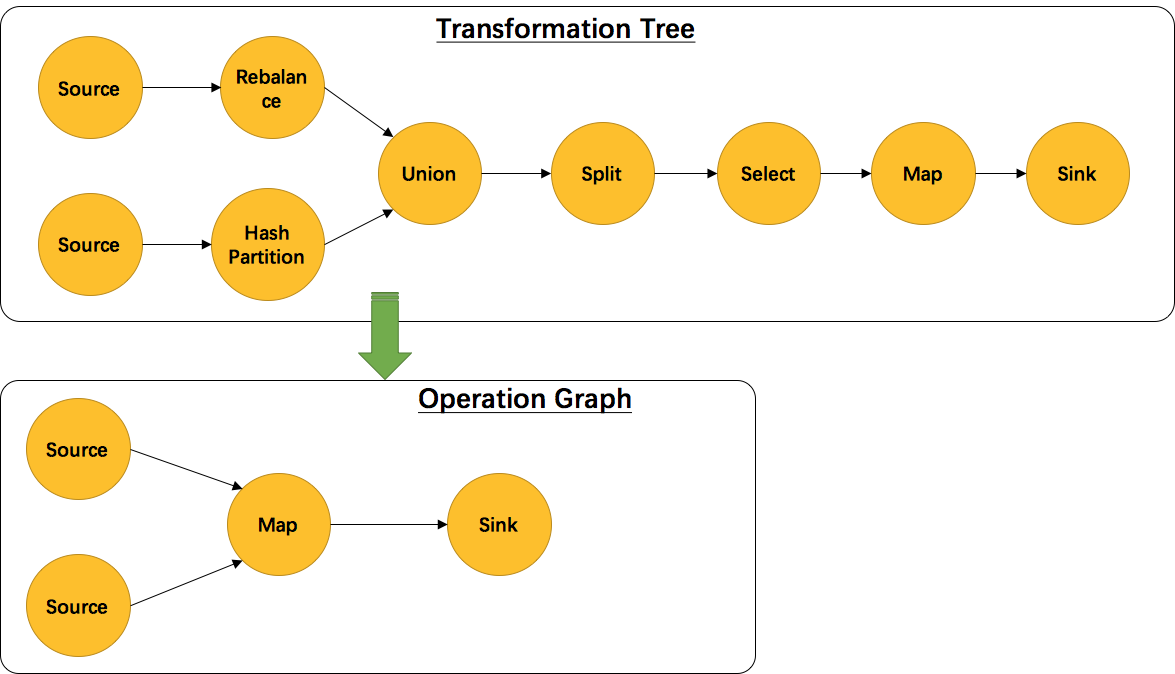
另外,并不是每一个 StreamTransformation 都会转换成runtime层中的物理操作。有一些只是逻辑概念,比如union、split/select、partition等。如下图所示的转换树,在运行时会优化成下方的操作图。
StreamGraph生成函数分析
我们从StreamGraphGenerator.generate()方法往下看:
1 | public static StreamGraph generate(StreamExecutionEnvironment env, List<StreamTransformation<?>> transformations) { |
因为map,filter等常用操作都是OneInputStreamOperator,我们就来看看 transformOneInputTransform((OneInputTransformation<?, ?>) transform) 方法。
1 | private <IN, OUT> Collection<Integer> transformOneInputTransform(OneInputTransformation<IN, OUT> transform) { |
WordCount函数的StreamGraph
flink提供了一个StreamGraph可视化显示工具, 在这里
我们可以把我们的程序的执行计划打印出来 System.out.println(env.getExecutionPlan()); 复制到这个网站上,点击生成,如图所示:

可以看到,我们源程序被转化成了4个operator。
另外,在operator之间的连线上也显示出了flink添加的一些逻辑流程。由于我设定了每个操作符的并行度都是1,所以在每个操作符之间都是直接FORWARD,不存在shuffle的过程。
JobGraph的生成
flink会根据上一步生成的StreamGraph生成JobGraph,然后将JobGraph发送到server端进行ExecutionGraph的解析。
JobGraph生成源码
与StreamGraph类似,JobGraph的入口方法是 StreamingJobGraphGenerator.createJobGraph() 。我们直接来看源码
1 | private JobGraph createJobGraph() { |
operator chain的逻辑
为了更高效地分布式执行,Flink会尽可能地将operator的subtask链接(chain)在一起形成task。每个task在一个线程中执行。将operators链接成task是非常有效的优化:它能减少线程之间的切换,减少消息的序列化/反序列化,减少数据在缓冲区的交换,减少了延迟的同时提高整体的吞吐量。
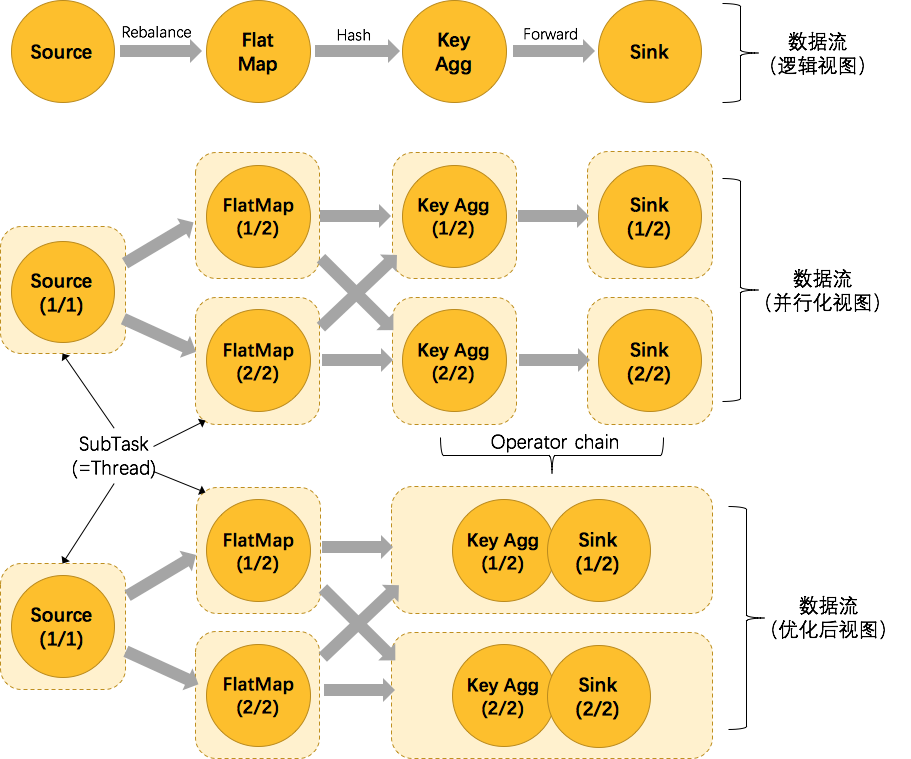
上图中将KeyAggregation和Sink两个operator进行了合并,因为这两个合并后并不会改变整体的拓扑结构。但是,并不是任意两个 operator 就能 chain 一起的,其条件还是很苛刻的:
- 上下游的并行度一致
- 下游节点的入度为1 (也就是说下游节点没有来自其他节点的输入)
- 上下游节点都在同一个 slot group 中(下面会解释 slot group)
- 下游节点的 chain 策略为 ALWAYS(可以与上下游链接,map、flatmap、filter等默认是ALWAYS)
- 上游节点的 chain 策略为 ALWAYS 或 HEAD(只能与下游链接,不能与上游链接,Source默认是HEAD)
- 两个节点间数据分区方式是 forward(参考理解数据流的分区)
- 用户没有禁用 chain
flink的chain逻辑是一种很常见的设计,比如spring的interceptor也是类似的实现方式。通过把操作符串成一个大操作符,flink避免了把数据序列化后通过网络发送给其他节点的开销,能够大大增强效率。
2.3.3 JobGraph的提交
前面已经提到,JobGraph的提交依赖于JobClient和JobManager之间的异步通信,如图所示:
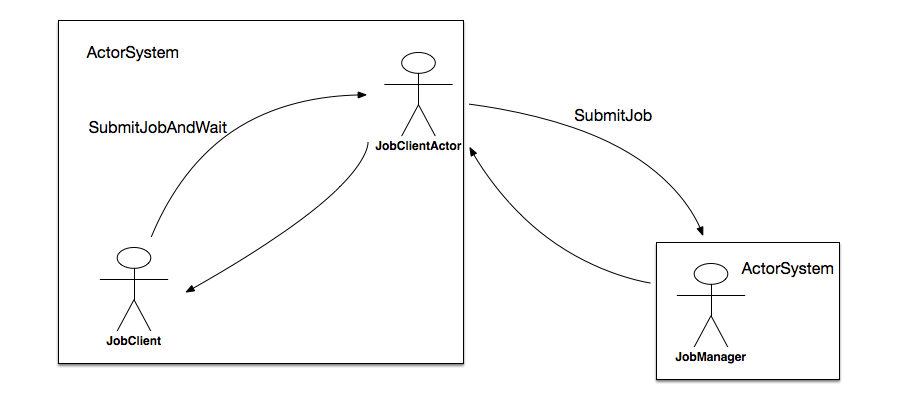
在submitJobAndWait方法中,其首先会创建一个JobClientActor的ActorRef,然后向其发起一个SubmitJobAndWait消息,该消息将JobGraph的实例提交给JobClientActor。发起模式是ask,它表示需要一个应答消息。
1 | Future<Object> future = Patterns.ask(jobClientActor, new JobClientMessages.SubmitJobAndWait(jobGraph), new Timeout(AkkaUtils.INF_TIMEOUT())); |
该SubmitJobAndWait消息被JobClientActor接收后,最终通过调用tryToSubmitJob方法触发真正的提交动作。当JobManager的actor接收到来自client端的请求后,会执行一个submitJob方法,主要做以下事情:
- 向BlobLibraryCacheManager注册该Job;
- 构建ExecutionGraph对象;
- 对JobGraph中的每个顶点进行初始化;
- 将DAG拓扑中从source开始排序,排序后的顶点集合附加到Exec> - utionGraph对象;
- 获取检查点相关的配置,并将其设置到ExecutionGraph对象;
- 向ExecutionGraph注册相关的listener;
- 执行恢复操作或者将JobGraph信息写入SubmittedJobGraphStore以在后续用于恢复目的;
- 响应给客户端JobSubmitSuccess消息;
- 对ExecutionGraph对象进行调度执行;
最后,JobManger会返回消息给JobClient,通知该任务是否提交成功。
ExecutionGraph的生成
与StreamGraph和JobGraph不同,ExecutionGraph并不是在我们的客户端程序生成,而是在服务端(JobManager处)生成的,顺便flink只维护一个JobManager。其入口代码是 ExecutionGraphBuilder.buildGraph(...)
该方法长200多行,其中一大半是checkpoiont的相关逻辑,我们暂且略过,直接看核心方法 executionGraph.attachJobGraph(sortedTopology)
因为ExecutionGraph事实上只是改动了JobGraph的每个节点,而没有对整个拓扑结构进行变动,所以代码里只是挨个遍历jobVertex并进行处理:
1 | for (JobVertex jobVertex : topologiallySorted) { |
至此,ExecutorGraph就创建完成了。
任务的调度与执行
关于flink的任务执行架构,官网的这两张图就是最好的说明:

Flink 集群启动后,首先会启动一个 JobManger 和多个的 TaskManager。用户的代码会由JobClient 提交给 JobManager,JobManager 再把来自不同用户的任务发给 不同的TaskManager 去执行,每个TaskManager管理着多个task,task是执行计算的最小结构, TaskManager 将心跳和统计信息汇报给 JobManager。TaskManager 之间以流的形式进行数据的传输。上述除了task外的三者均为独立的 JVM 进程。
要注意的是,TaskManager和job并非一一对应的关系。flink调度的最小单元是task而非TaskManager,也就是说,来自不同job的不同task可能运行于同一个TaskManager的不同线程上。
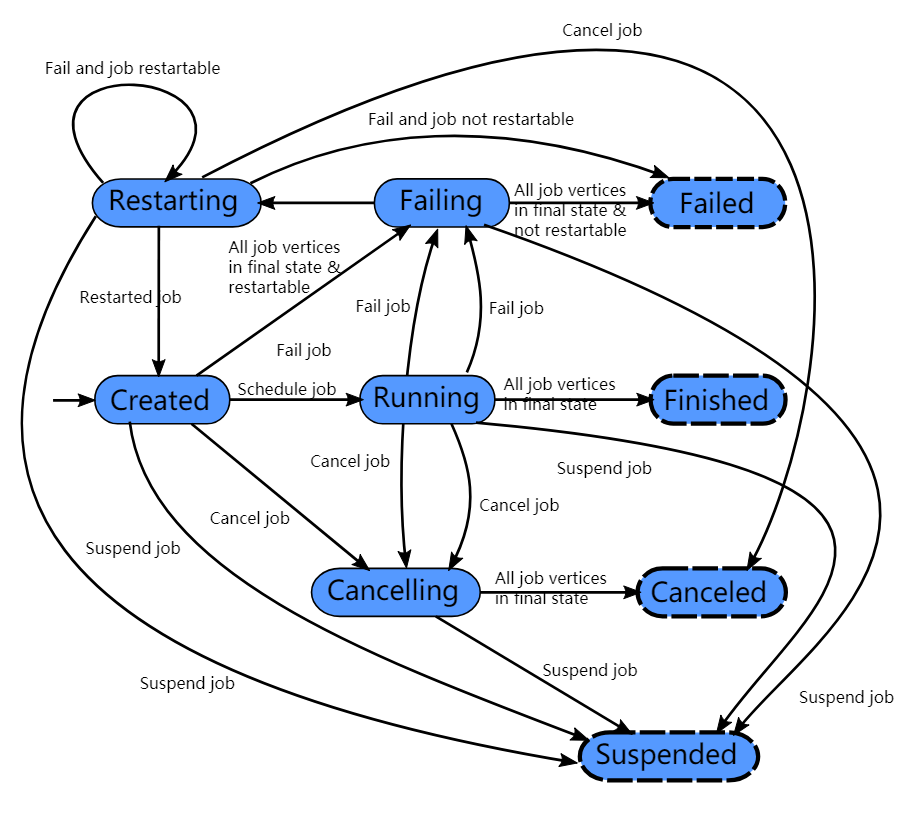
一个flink任务所有可能的状态如上图所示。图上画的很明白,就不再赘述了。
计算资源的调度
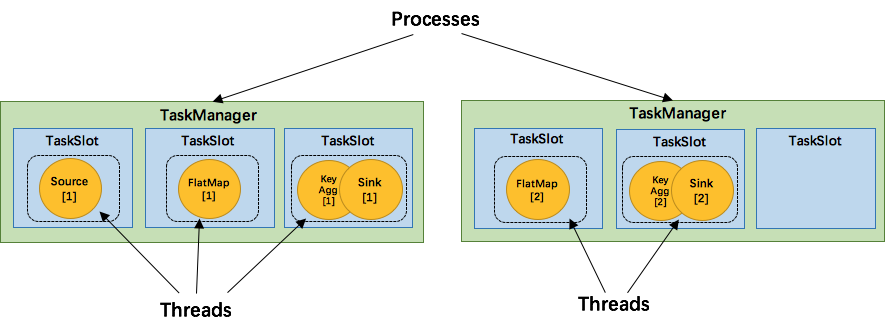
Task slot是一个TaskManager内资源分配的最小载体,代表了一个固定大小的资源子集,每个TaskManager会将其所占有的资源平分给它的slot。
通过调整 task slot 的数量,用户可以定义task之间是如何相互隔离的。每个 TaskManager 有一个slot,也就意味着每个task运行在独立的 JVM 中。每个 TaskManager 有多个slot的话,也就是说多个task运行在同一个JVM中。
而在同一个JVM进程中的task,可以共享TCP连接(基于多路复用)和心跳消息,可以减少数据的网络传输,也能共享一些数据结构,一定程度上减少了每个task的消耗。
每个slot可以接受单个task,也可以接受多个连续task组成的pipeline,如下图所示,FlatMap函数占用一个taskslot,而key Agg函数和sink函数共用一个taskslot:
为了达到共用slot的目的,除了可以以chain的方式pipeline算子,我们还可以允许SlotSharingGroup,如下图所示:
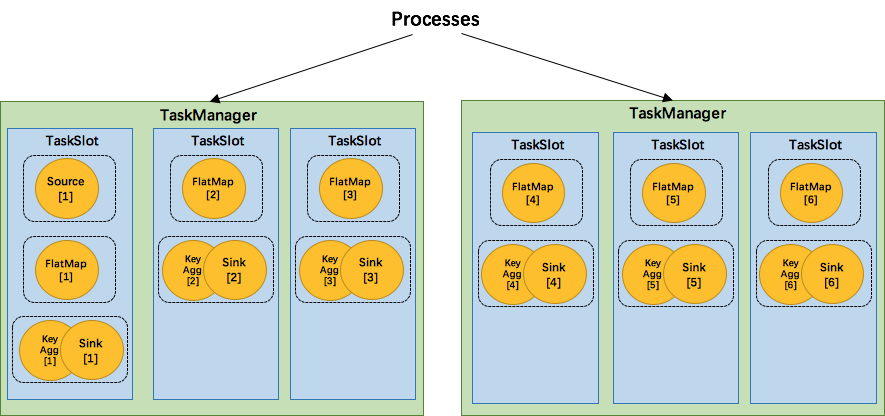
我们可以把不能被chain成一条的两个操作如flatmap和key&sink放在一个TaskSlot里执行,这样做可以获得以下好处:
- 共用slot使得我们不再需要计算每个任务需要的总task数目,直接取最高算子的并行度即可
- 对计算资源的利用率更高。例如,通常的轻量级操作map和重量级操作Aggregate不再分别需要一个线程,而是可以在同一个线程内执行,而且对于slot有限的场景,我们可以增大每个task的并行度了。
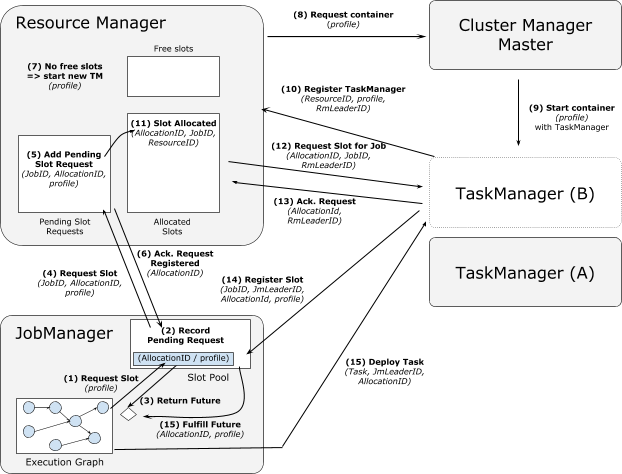
- 接下来我们还是用官网的图来说明flink是如何重用slot的:
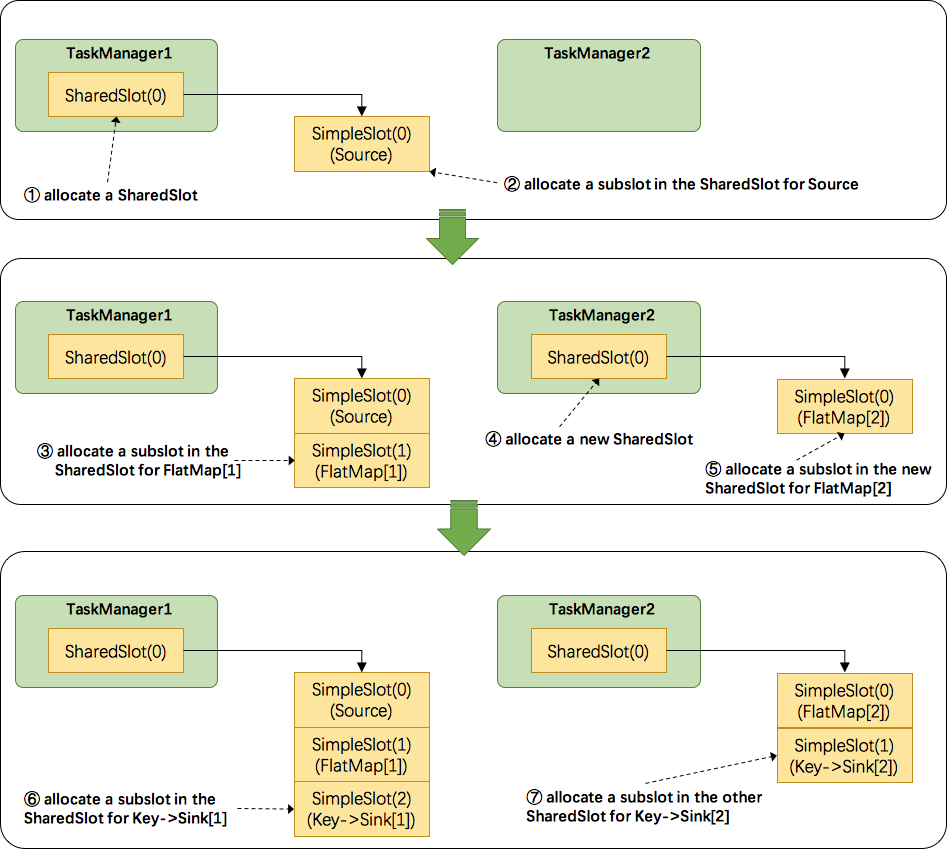
1. TaskManager1分配一个SharedSlot0
2. 把source task放入一个SimpleSlot0,再把该slot放入SharedSlot0
3. 把flatmap task放入一个SimpleSlot1,再把该slot放入SharedSlot0
4. 因为我们的flatmap task并行度是2,因此不能再放入SharedSlot0,所以向TaskMange21申请了一个新的SharedSlot0
5. 把第二个flatmap task放进一个新的SimpleSlot,并放进TaskManager2的SharedSlot0
6. 开始处理key&sink task,因为其并行度也是2,所以先把第一个task放进TaskManager1的SharedSlot
7. 把第二个key&sink放进TaskManager2的SharedSlot
JobManager执行job
JobManager负责接收 flink 的作业,调度 task,收集 job 的状态、管理 TaskManagers。被实现为一个 akka actor。
JobManager的组件
- BlobServer 是一个用来管理二进制大文件的服务,比如保存用户上传的jar文件,该服务会将其写到磁盘上。还有一些相关的类,如BlobCache,用于TaskManager向JobManager下载用户的jar文件
- InstanceManager 用来管理当前存活的TaskManager的组件,记录了TaskManager的心跳信息等
- CompletedCheckpointStore 用于保存已完成的checkpoint相关信息,持久化到内存中或者zookeeper上
- MemoryArchivist 保存了已经提交到flink的作业的相关信息,如JobGraph等
JobManager的启动过程
先列出JobManager启动的核心代码
1 | def runJobManager( |
- 配置Akka并生成ActorSystem,启动JobManager
- 启动HA和metric相关服务
- 在
startJobManagerActors()方法中启动JobManagerActors,以及webserver,TaskManagerActor,ResourceManager等等 - 阻塞等待终止
- 集群通过LeaderService等选出JobManager的leader
JobManager启动Task
JobManager 是一个Actor,通过各种消息来完成核心逻辑:
1 | override def handleMessage: Receive = { |
有几个比较重要的消息:
- GrantLeadership 获得leader授权,将自身被分发到的 session id 写到 zookeeper,并恢复所有的 jobs
- RevokeLeadership 剥夺leader授权,打断清空所有的 job 信息,但是保留作业缓存,注销所有的 TaskManagers
- RegisterTaskManagers 注册 TaskManager,如果之前已经注册过,则只给对应的 Instance 发送消息,否则启动注册逻辑:在 InstanceManager 中注册该 Instance 的信息,并停止 Instance BlobLibraryCacheManager 的端口【供下载 lib 包用】,同时使用 watch 监听 task manager 的存活
- SubmitJob 提交 jobGraph
- 最后一项SubmintJob就是我们要关注的,从客户端收到JobGraph,转换为ExecutionGraph并执行的过程。
1 | private def submitJob(jobGraph: JobGraph, jobInfo: JobInfo, isRecovery: Boolean = false): Unit = { |
首先做一些准备工作,然后获取一个ExecutionGraph,判断是否是恢复的job,然后将job保存下来,并且通知客户端本地已经提交成功了,最后如果确认本JobManager是leader,则执行 executionGraph.scheduleForExecution() 方法,这个方法经过一系列调用,把每个ExecutionVertex传递给了Excution类的deploy方法:
1 | public void deploy() throws JobException { |
我们首先生成了一个TaskDeploymentDescriptor,然后交给了 taskManagerGateway.submitTask() 方法执行。接下来的部分,就属于TaskManager的范畴了。
TaskManager执行task
TaskManager的基本组件
TaskManager是flink中资源管理的基本组件,是所有执行任务的基本容器,提供了内存管理、IO管理、通信管理等一系列功能,本节对各个模块进行简要介绍。
- MemoryManager flink并没有把所有内存的管理都委托给JVM,因为JVM普遍存在着存储对象密度低、大内存时GC对系统影响大等问题。所以flink自己抽象了一套内存管理机制,将所有对象序列化后放在自己的MemorySegment上进行管理。MemoryManger涉及内容较多,将在后续章节进行继续剖析。
- IOManager flink通过IOManager管理磁盘IO的过程,提供了同步和异步两种写模式,又进一步区分了block、buffer和bulk三种读写方式。
IOManager提供了两种方式枚举磁盘文件,一种是直接遍历文件夹下所有文件,另一种是计数器方式,对每个文件名以递增顺序访问。
在底层,flink将文件IO抽象为FileIOChannle,封装了底层实现。
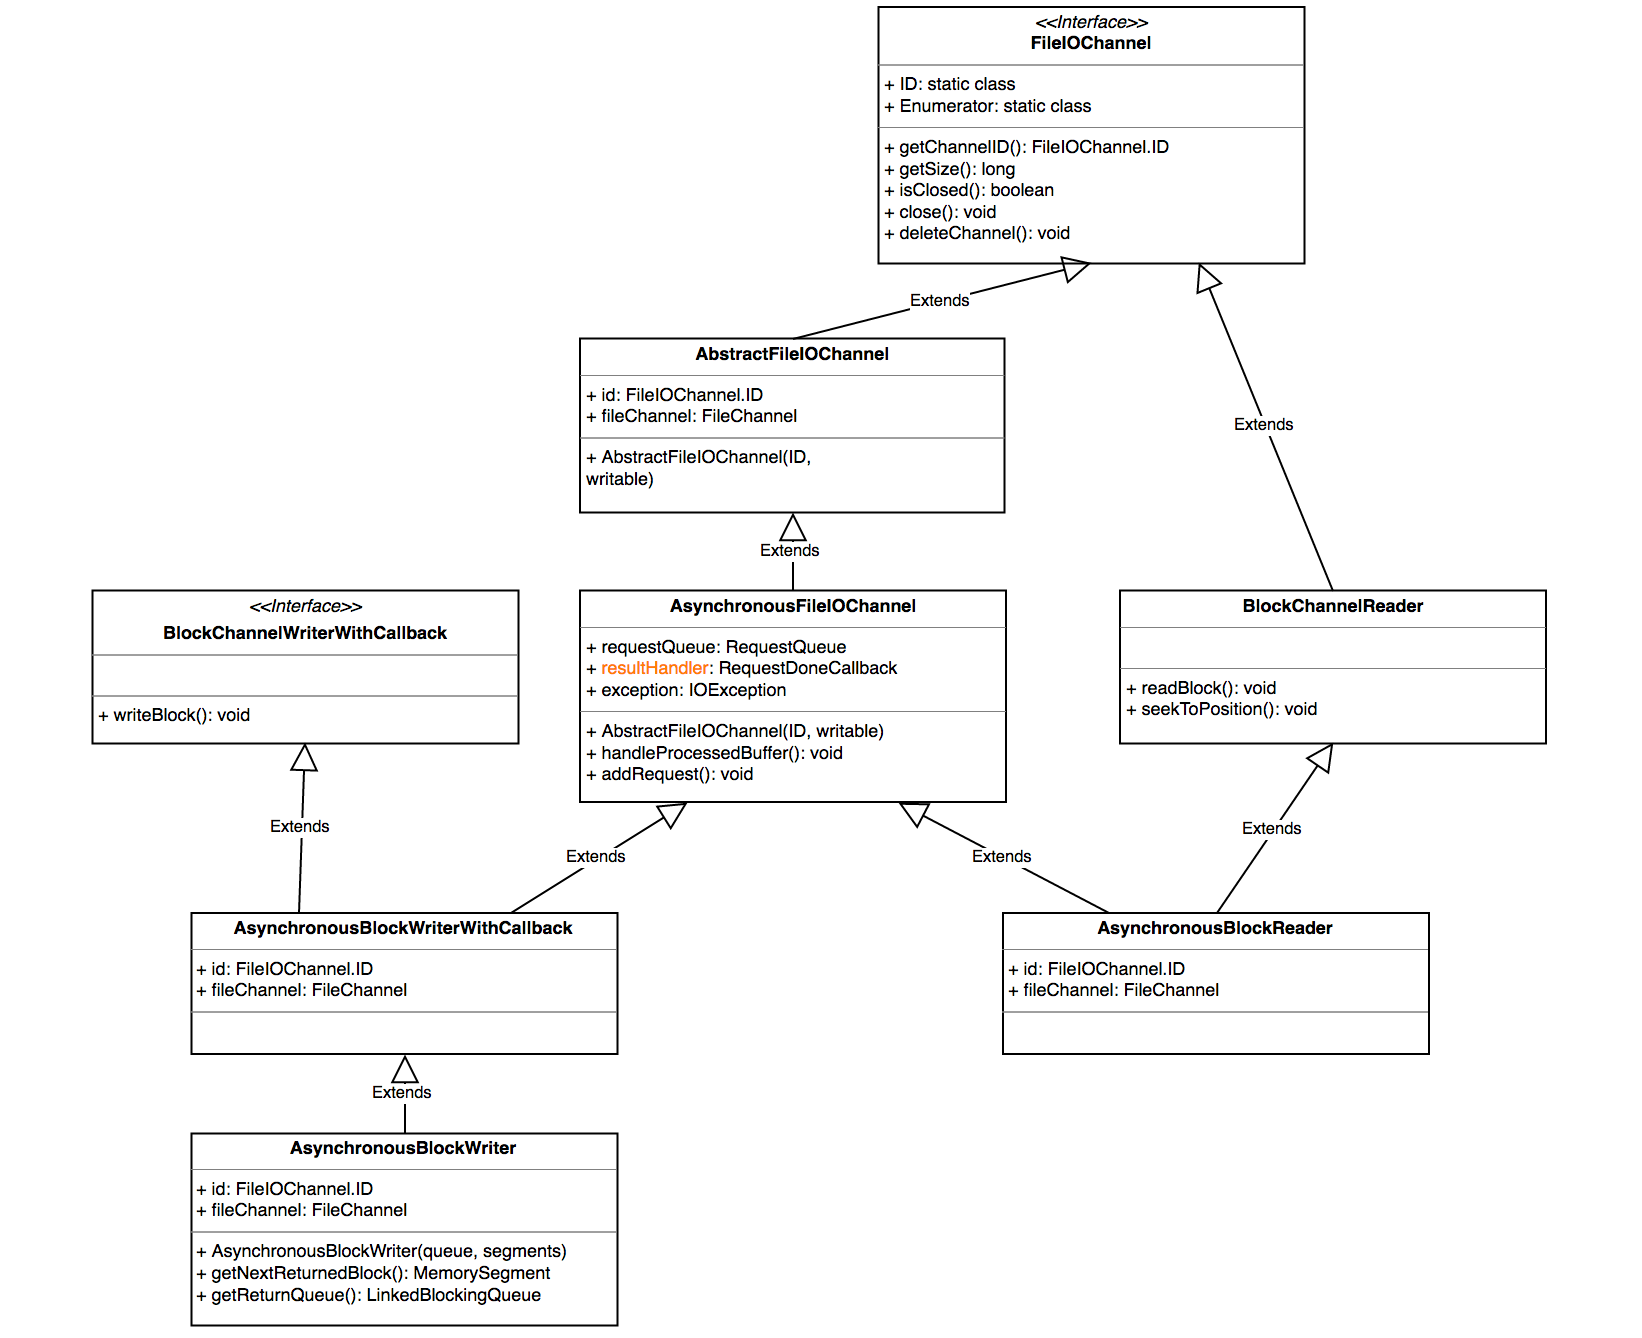
可以看到,flink在底层实际上都是以异步的方式进行读写。
- NetworkEnvironment 是TaskManager的网络 IO 组件,包含了追踪中间结果和数据交换的数据结构。它的构造器会统一将配置的内存先分配出来,抽象成 NetworkBufferPool 统一管理内存的申请和释放。意思是说,在输入和输出数据时,不管是保留在本地内存,等待chain在一起的下个操作符进行处理,还是通过网络把本操作符的计算结果发送出去,都被抽象成了NetworkBufferPool。后续我们还将对这个组件进行详细分析。
TaskManager执行Task
对于TM来说,执行task就是把收到的 TaskDeploymentDescriptor 对象转换成一个task并执行的过程。TaskDeploymentDescriptor这个类保存了task执行所必须的所有内容,例如序列化的算子,输入的InputGate和输出的ResultPartition的定义,该task要作为几个subtask执行等等。
按照正常逻辑思维,很容易想到TM的submitTask方法的行为:首先是确认资源,如寻找JobManager和Blob,而后建立连接,解序列化算子,收集task相关信息,接下来就是创建一个新的 Task 对象,这个task对象就是真正执行任务的关键所在。
1 | val task = new Task( |
如果读者是从头开始看这篇blog,里面有很多对象应该已经比较明确其作用了(除了那个brVarManager,这个是管理广播变量的,广播变量是一类会被分发到每个任务中的共享变量)。接下来的主要任务,就是把这个task启动起来,然后报告说已经启动task了:
1 | // all good, we kick off the task, which performs its own initialization |
3.3.2.1 生成Task对象
在执行new Task()方法时,第一步是把构造函数里的这些变量赋值给当前task的fields。
接下来是初始化ResultPartition和InputGate。这两个类描述了task的输出数据和输入数据。
1 | for (ResultPartitionDeploymentDescriptor desc: resultPartitionDeploymentDescriptors) { |
最后,创建一个Thread对象,并把自己放进该对象,这样在执行时,自己就有了自身的线程的引用。
运行Task对象
Task对象本身就是一个Runable,因此在其run方法里定义了运行逻辑。
第一步是切换Task的状态:
1 | while (true) { |
接下来,就是导入用户类加载器并加载用户代码。
然后,是向网络管理器注册当前任务(flink的各个算子在运行时进行数据交换需要依赖网络管理器),分配一些缓存以保存数据
然后,读入指定的缓存文件。
然后,再把task创建时传入的那一大堆变量用于创建一个执行环境Envrionment。
再然后,对于那些并不是第一次执行的task(比如失败后重启的)要恢复其状态。
接下来最重要的是
invokable.invoke();
方法。为什么这么说呢,因为这个方法就是用户代码所真正被执行的入口。比如我们写的什么new MapFunction()的逻辑,最终就是在这里被执行的。这里说一下这个invokable,这是一个抽象类,提供了可以被TaskManager执行的对象的基本抽象。
这个invokable是在解析JobGraph的时候生成相关信息的,并在此处形成真正可执行的对象
1 | // now load the task's invokable code |
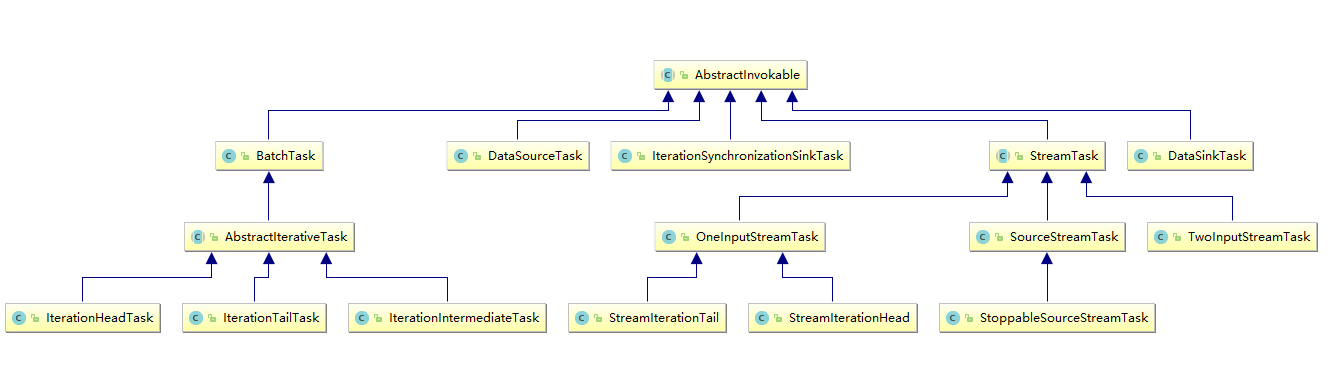
上图显示了flink提供的可被执行的Task类型。从名字上就可以看出各个task的作用,在此不再赘述。
接下来就是invoke方法了,因为我们的wordcount例子用了流式api,在此我们以StreamTask的invoke方法为例进行说明。
StreamTask的执行逻辑
先上部分核心代码:
1 | public final void invoke() throws Exception { |
StreamTask.invoke()方法里,第一个值得一说的是 TimerService 。Flink在2015年决定向StreamTask类加入timer service的时候解释到:
This integrates the timer as a service in StreamTask that StreamOperators can use by calling a method on the StreamingRuntimeContext. This also ensures that the timer callbacks can not be called concurrently with other methods on the StreamOperator. This behaviour is ensured by an ITCase.
第二个要注意的是chain操作。前面提到了,flink会出于优化的角度,把一些算子chain成一个整体的算子作为一个task来执行。比如wordcount例子中,Source和FlatMap算子就被chain在了一起。在进行chain操作的时候,会设定头节点,并且指定输出的RecordWriter。
接下来不出所料仍然是初始化,只不过初始化的对象变成了各个operator。如果是有checkpoint的,那就从state信息里恢复,不然就作为全新的算子处理。从源码中可以看到,flink针对keyed算子和普通算子做了不同的处理。keyed算子在初始化时需要计算出一个group区间,这个区间的值在整个生命周期里都不会再变化,后面key就会根据hash的不同结果,分配到特定的group中去计算。顺便提一句,flink的keyed算子保存的是对每个数据的key的计算方法,而非真实的key,用户需要自己保证对每一行数据提供的keySelector的幂等性。至于为什么要用KeyGroup的设计,这就牵扯到扩容的范畴了,将在后面的章节进行讲述。
对于 openAllOperators() 方法,就是对各种RichOperator执行其open方法,通常可用于在执行计算之前加载资源。
最后,run方法千呼万唤始出来,该方法经过一系列跳转,最终调用chain上的第一个算子的run方法。在wordcount的例子中,它最终调用了SocketTextStreamFunction的run,建立socket连接并读入文本。
StreamTask与StreamOperator
前面提到,Task对象在执行过程中,把执行的任务交给了StreamTask这个类去执行。在我们的wordcount例子中,实际初始化的是OneInputStreamTask的对象(参考上面的类图)。那么这个对象是如何执行用户的代码的呢?
1 | protected void run() throws Exception { |
它做的,就是把任务直接交给了InputProcessor去执行processInput方法。这是一个 StreamInputProcessor 的实例,该processor的任务就是处理输入的数据,包括用户数据、watermark和checkpoint数据等。我们先来看看这个processor是如何产生的:
1 | public void init() throws Exception { |
这是OneInputStreamTask的init方法,从configs里面获取StreamOperator信息,生成自己的inputProcessor。那么inputProcessor是如何处理数据的呢?我们接着跟进源码:
1 | public boolean processInput() throws Exception { |
到此为止,以上部分就是一个flink程序启动后,到执行用户代码之前,flink框架所做的准备工作。回顾一下:
- 启动一个环境
- 生成StreamGraph
- 注册和选举JobManager
- 在各节点生成TaskManager,并根据JobGraph生成对应的Task
- 启动各个task,准备执行代码
接下来,我们挑几个Operator看看flink是如何抽象这些算子的。
StreamOperator的抽象与实现
数据源的逻辑——StreamSource与时间模型
StreamSource抽象了一个数据源,并且指定了一些如何处理数据的模式。
1 | public class StreamSource<OUT, SRC extends SourceFunction<OUT>> |
在StreamSource生成上下文之后,接下来就是把上下文交给SourceFunction去执行:
userFunction.run(ctx);
SourceFunction是对Function的一个抽象,就好像MapFunction,KeyByFunction一样,用户选择实现这些函数,然后flink框架就能利用这些函数进行计算,完成用户逻辑。
我们的wordcount程序使用了flink提供的一个SocketTextStreamFunction。我们可以看一下它的实现逻辑,对source如何运行有一个基本的认识:
1 | public void run(SourceContext<String> ctx) throws Exception { |
整段代码里,只有collect方法有些复杂度,后面我们在讲到flink的对象机制时会结合来讲,此处知道collect方法会收集结果,然后发送给接收者即可。在我们的wordcount里,这个算子的接收者就是被chain在一起的flatmap算子,不记得这个示例程序的话,可以返回第一章去看一下。
从数据输入到数据处理——OneInputStreamOperator & AbstractUdfStreamOperator
StreamSource是用来开启整个流的算子,而承接输入数据并进行处理的算子就是OneInputStreamOperator、TwoInputStreamOperator等。

整个StreamOperator的继承关系如上图所示(图很大,建议点开放大看)。
OneInputStreamOperator这个接口的逻辑很简单:
1 | public interface OneInputStreamOperator<IN, OUT> extends StreamOperator<OUT> { |
而实现了这个接口的StreamFlatMap算子也很简单,没什么可说的:
1 | public class StreamFlatMap<IN, OUT> |
从类图里可以看到,flink为我们封装了一个算子的基类 AbstractUdfStreamOperator ,提供了一些通用功能,比如把context赋给算子,保存快照等等,其中最为大家了解的应该是这两个:
1 | @Override |
这两个就是flink提供的 Rich***Function 系列算子的open和close方法被执行的地方。
StreamSink
StreamSink着实没什么可说的,逻辑很简单,值得一提的只有两个方法:
1 | @Override |
其中, processElement 是继承自StreamOperator的方法。 reportOrForwardLatencyMarker 是用来计算延迟的,前面提到StreamSource会产生LateMarker,用于记录数据计算时间,就是在这里完成了计算。
算子这部分逻辑相对简单清晰,就讲这么多吧。
为执行保驾护航——Fault Tolerant与保证Exactly-Once语义
Fault Tolerant演进之路
对于7×24小时不间断运行的流程序来说,要保证fault tolerant是很难的,这不像是离线任务,如果失败了只需要清空已有结果,重新跑一次就可以了。对于流任务,如果要保证能够重新处理已处理过的数据,就要把数据保存下来;而这就面临着几个问题:比如一是保存多久的数据?二是重复计算的数据应该怎么处理,怎么保证幂等性?
对于一个流系统,我们有以下希望:
- 最好能做到exactly-once
- 处理延迟越低越好
- 吞吐量越高越好
- 计算模型应当足够简单易用,又具有足够的表达力
- 从错误恢复的开销越低越好
- 足够的流控制能力(背压能力)
Storm的Record acknowledgement模式
storm的fault tolerant是这样工作的:每一个被storm的operator处理的数据都会向其上一个operator发送一份应答消息,通知其已被下游处理。storm的源operator保存了所有已发送的消息的每一个下游算子的应答消息,当它收到来自sink的应答时,它就知道该消息已经被完整处理,可以移除了。
如果没有收到应答,storm就会重发该消息。显而易见,这是一种at least once的逻辑。另外,这种方式面临着严重的幂等性问题,例如对一个count算子,如果count的下游算子出错,source重发该消息,那么防止该消息被count两遍的逻辑需要程序员自己去实现。最后,这样一种处理方式非常低效,吞吐量很低。
Spark streaming的micro batch模式
前面提到,storm的实现方式就注定了与高吞吐量无缘。那么,为了提高吞吐量,把一批数据聚集在一起处理就是很自然的选择。Spark Streaming的实现就是基于这样的思路:
我们可以在完全的连续计算与完全的分批计算中间取折中,通过控制每批计算数据的大小来控制延迟与吞吐量的制约,如果想要低延迟,就用小一点的batch,如果想要大吞吐量,就不得不忍受更高的延迟(更久的等待数据到来的时间和更多的计算),如下图所示。
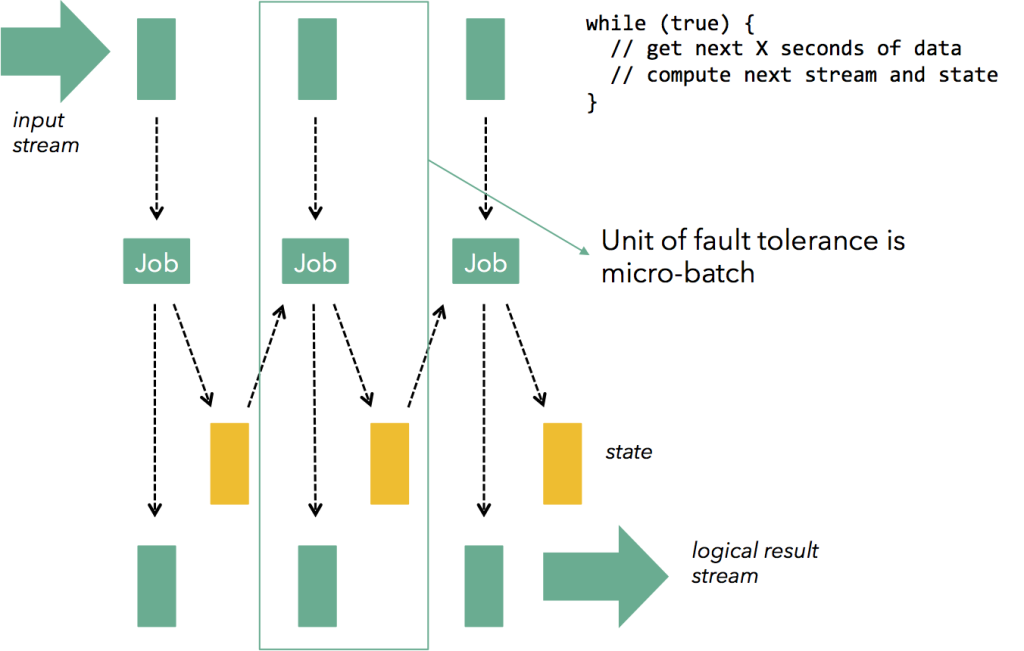
以这样的方式,可以在每个batch中做到exactly-once,但是这种方式也有其弊端:
首先,batch的方式使得一些需要跨batch的操作变得非常困难,例如session window;用户不得不自己想办法去实现相关逻辑。
其次,batch模式很难做好背压。当一个batch因为种种原因处理慢了,那么下一个batch要么不得不容纳更多的新来数据,要么不得不堆积更多的batch,整个任务可能会被拖垮,这是一个非常致命的问题。
最后,batch的方式基本意味着其延迟是有比较高的下限的,实时性上不好。
Google Cloud Dataflow的事务式模型
我们在传统数据库,如mysql中使用binlog来完成事务,这样的思路也可以被用在实现exactly-once模型中。例如,我们可以log下每个数据元素每一次被处理时的结果和当时所处的操作符的状态。这样,当我们需要fault tolerant时,我们只需要读一下log就可以了。这种模式规避了storm和spark所面临的问题,并且能够很好的实现exactly-once,唯一的弊端是:如何尽可能的减少log的成本?Flink给了我们答案。
Flink的分布式快照机制
实现exactly-once的关键是什么?是能够准确的知道和快速记录下来当前的operator的状态、当前正在处理的元素(以及正处在不同算子之间传递的元素)。如果上面这些可以做到,那么fault tolerant无非就是从持久化存储中读取上次记录的这些元信息,并且恢复到程序中。那么Flink是如何实现的呢?
Flink的分布式快照的核心是其轻量级异步分布式快照机制。为了实现这一机制,flink引入了一个概念,叫做Barrier。Barrier是一种标记,它被source产生并且插入到流数据中,被发送到下游节点。当下游节点处理到该barrier标志时,这就意味着在该barrier插入到流数据时,已经进入系统的数据在当前节点已经被处理完毕。
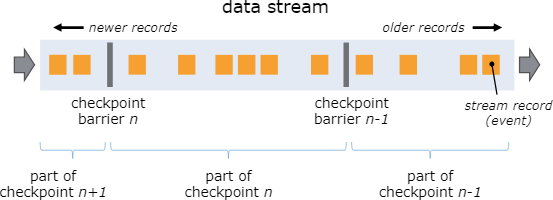
如图所示,每当一个barrier流过一个算子节点时,就说明了在该算子上,可以触发一次检查点,用以保存当前节点的状态和已经处理过的数据,这就是一份快照。(在这里可以联想一下micro-batch,把barrier想象成分割每个batch的逻辑,会好理解一点)这样的方式下,记录快照就像和前面提到的micro-batch一样容易。
与此同时,该算子会向下游发送该barrier。因为数据在算子之间是按顺序发送的,所以当下游节点收到该barrier时,也就意味着同样的一批数据在下游节点上也处理完毕,可以进行一次checkpoint,保存基于该节点的一份快照,快照完成后,会通知JobMananger自己完成了这个快照。这就是分布式快照的基本含义。
再看这张图:

有时,有的算子的上游节点和下游节点都不止一个,应该怎么处理呢?如果有不止一个下游节点,就向每个下游发送barrier。同理,如果有不止一个上游节点,那么就要等到所有上游节点的同一批次的barrier到达之后,才能触发checkpoint。因为每个节点运算速度不同,所以有的上游节点可能已经在发下个barrier周期的数据了,有的上游节点还没发送本次的barrier,这时候,当前算子就要缓存一下提前到来的数据,等比较慢的上游节点发送barrier之后,才能处理下一批数据。
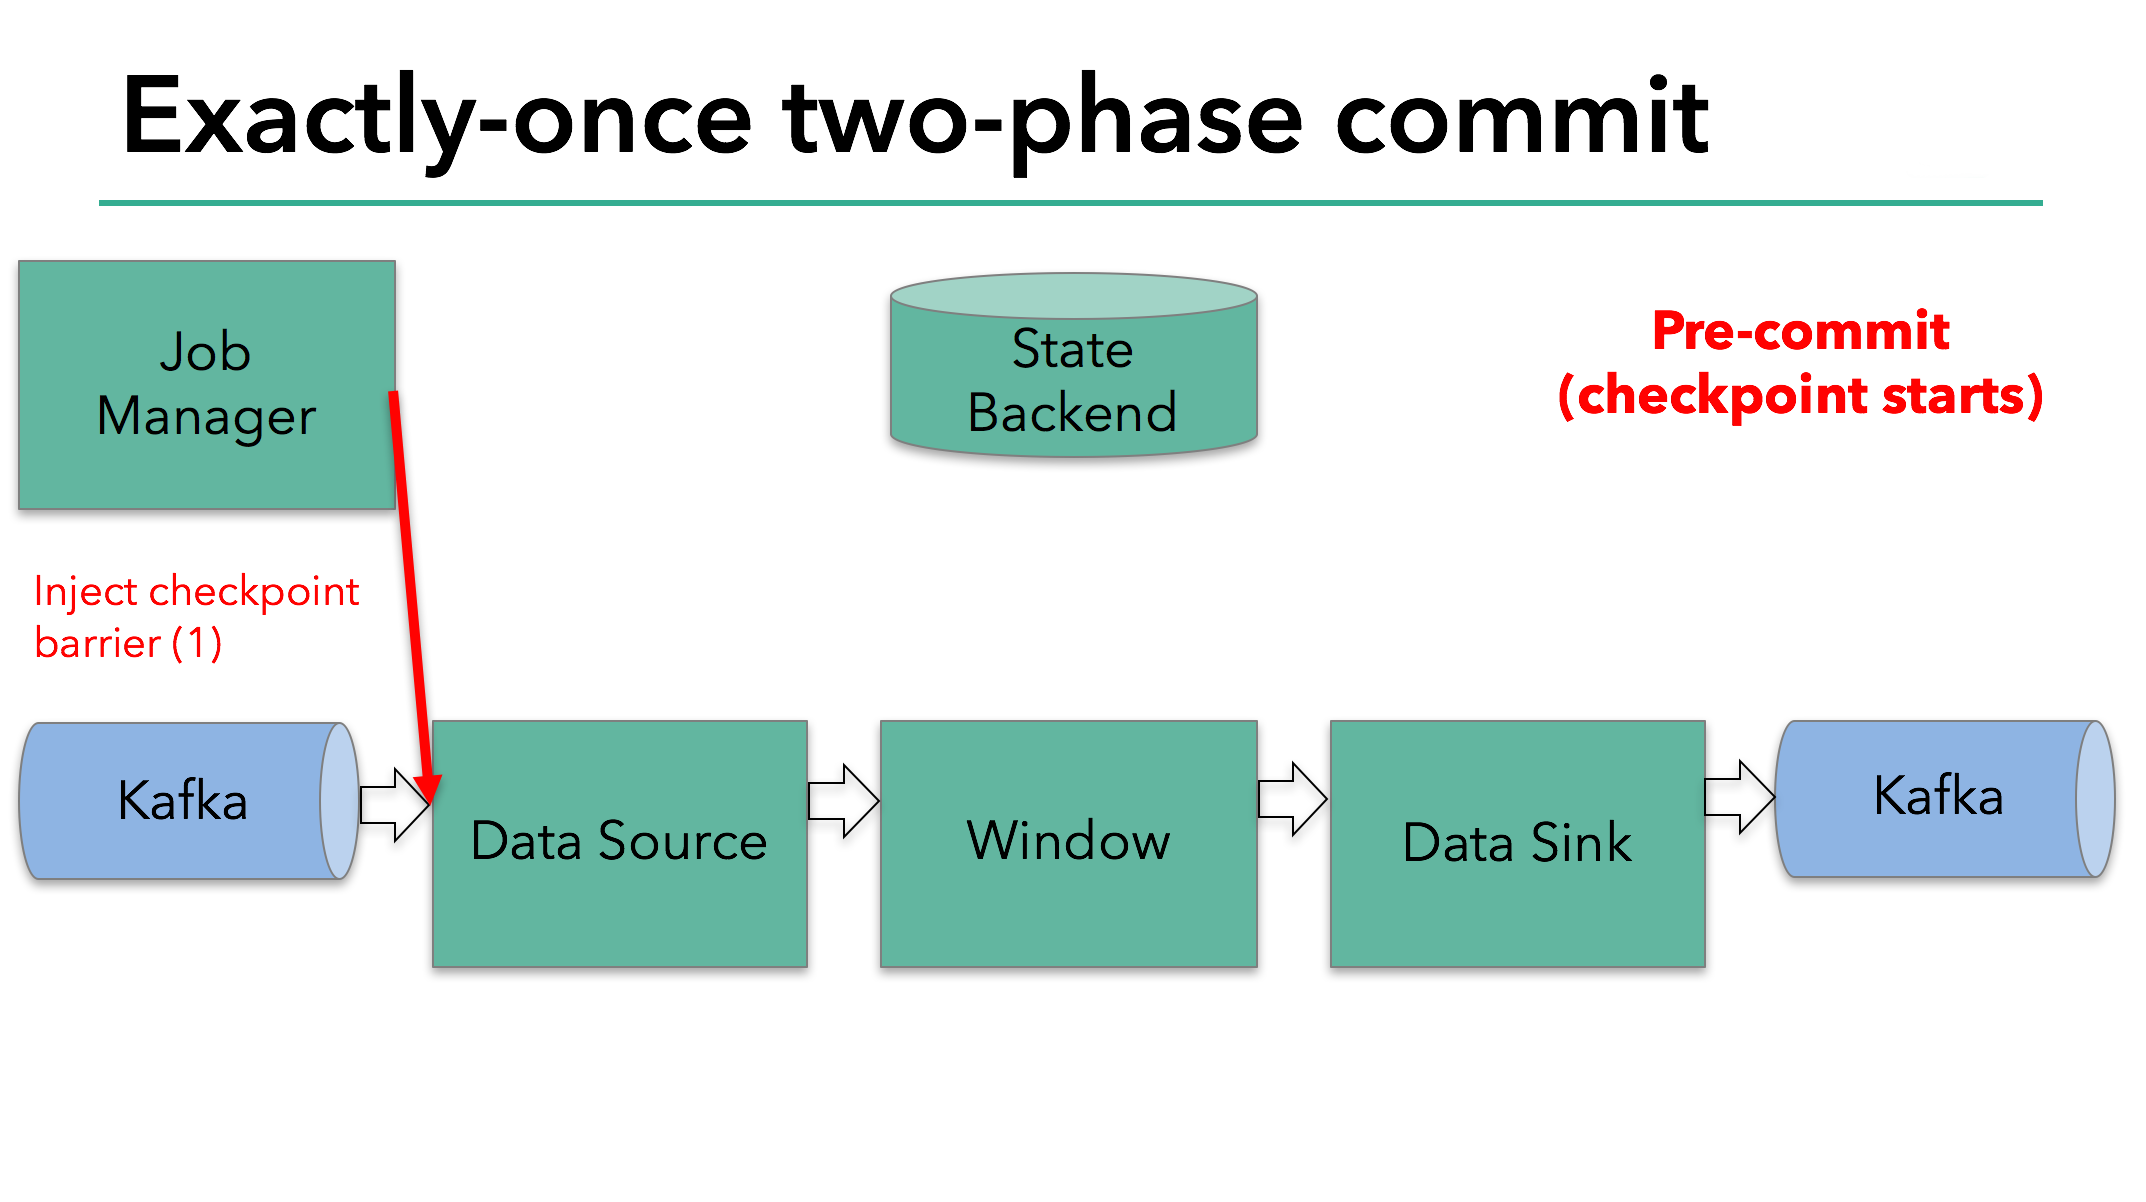
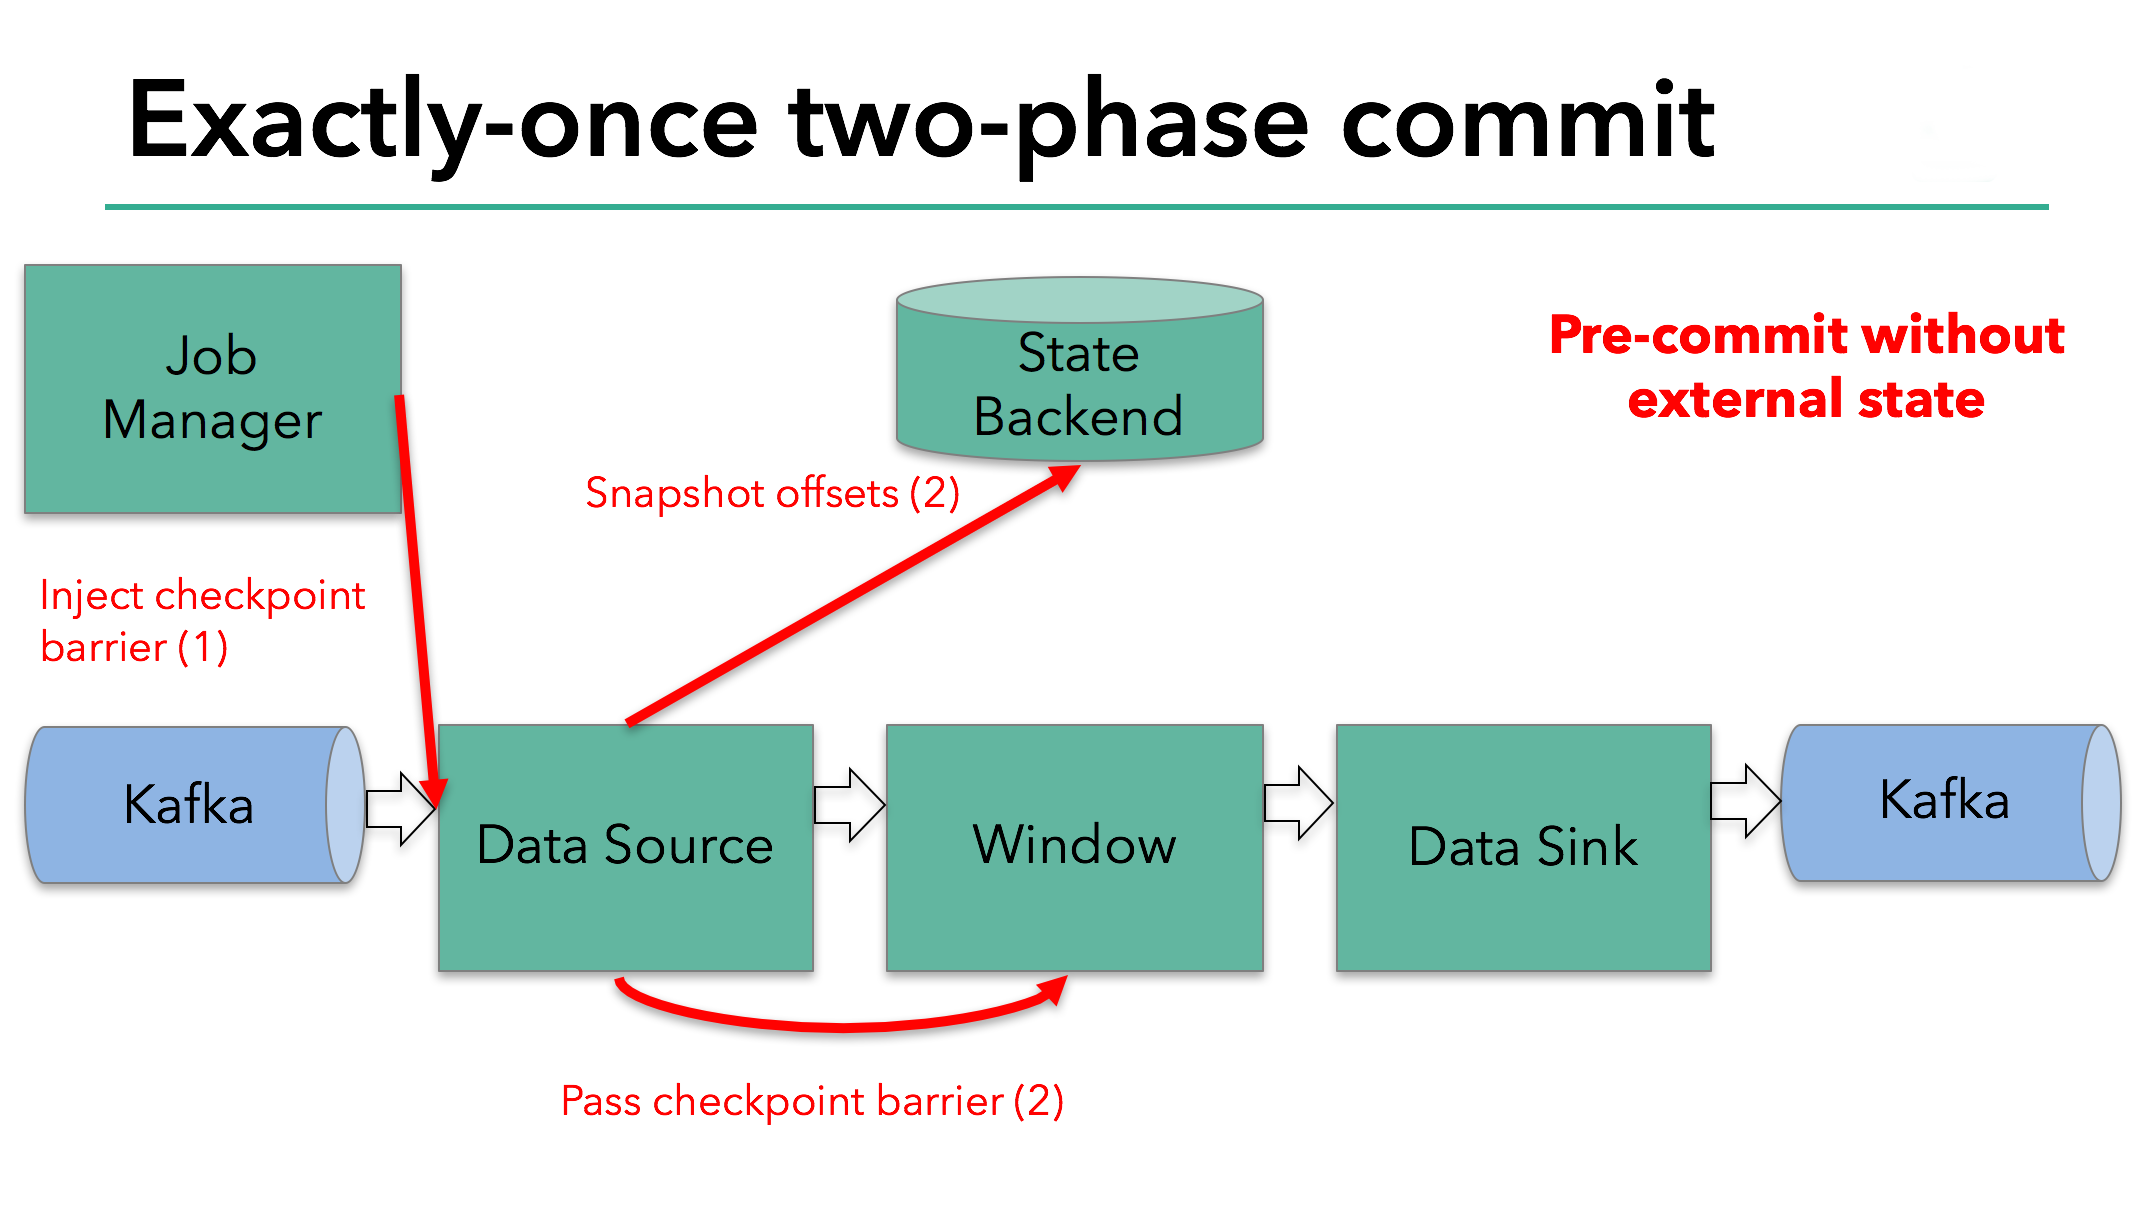
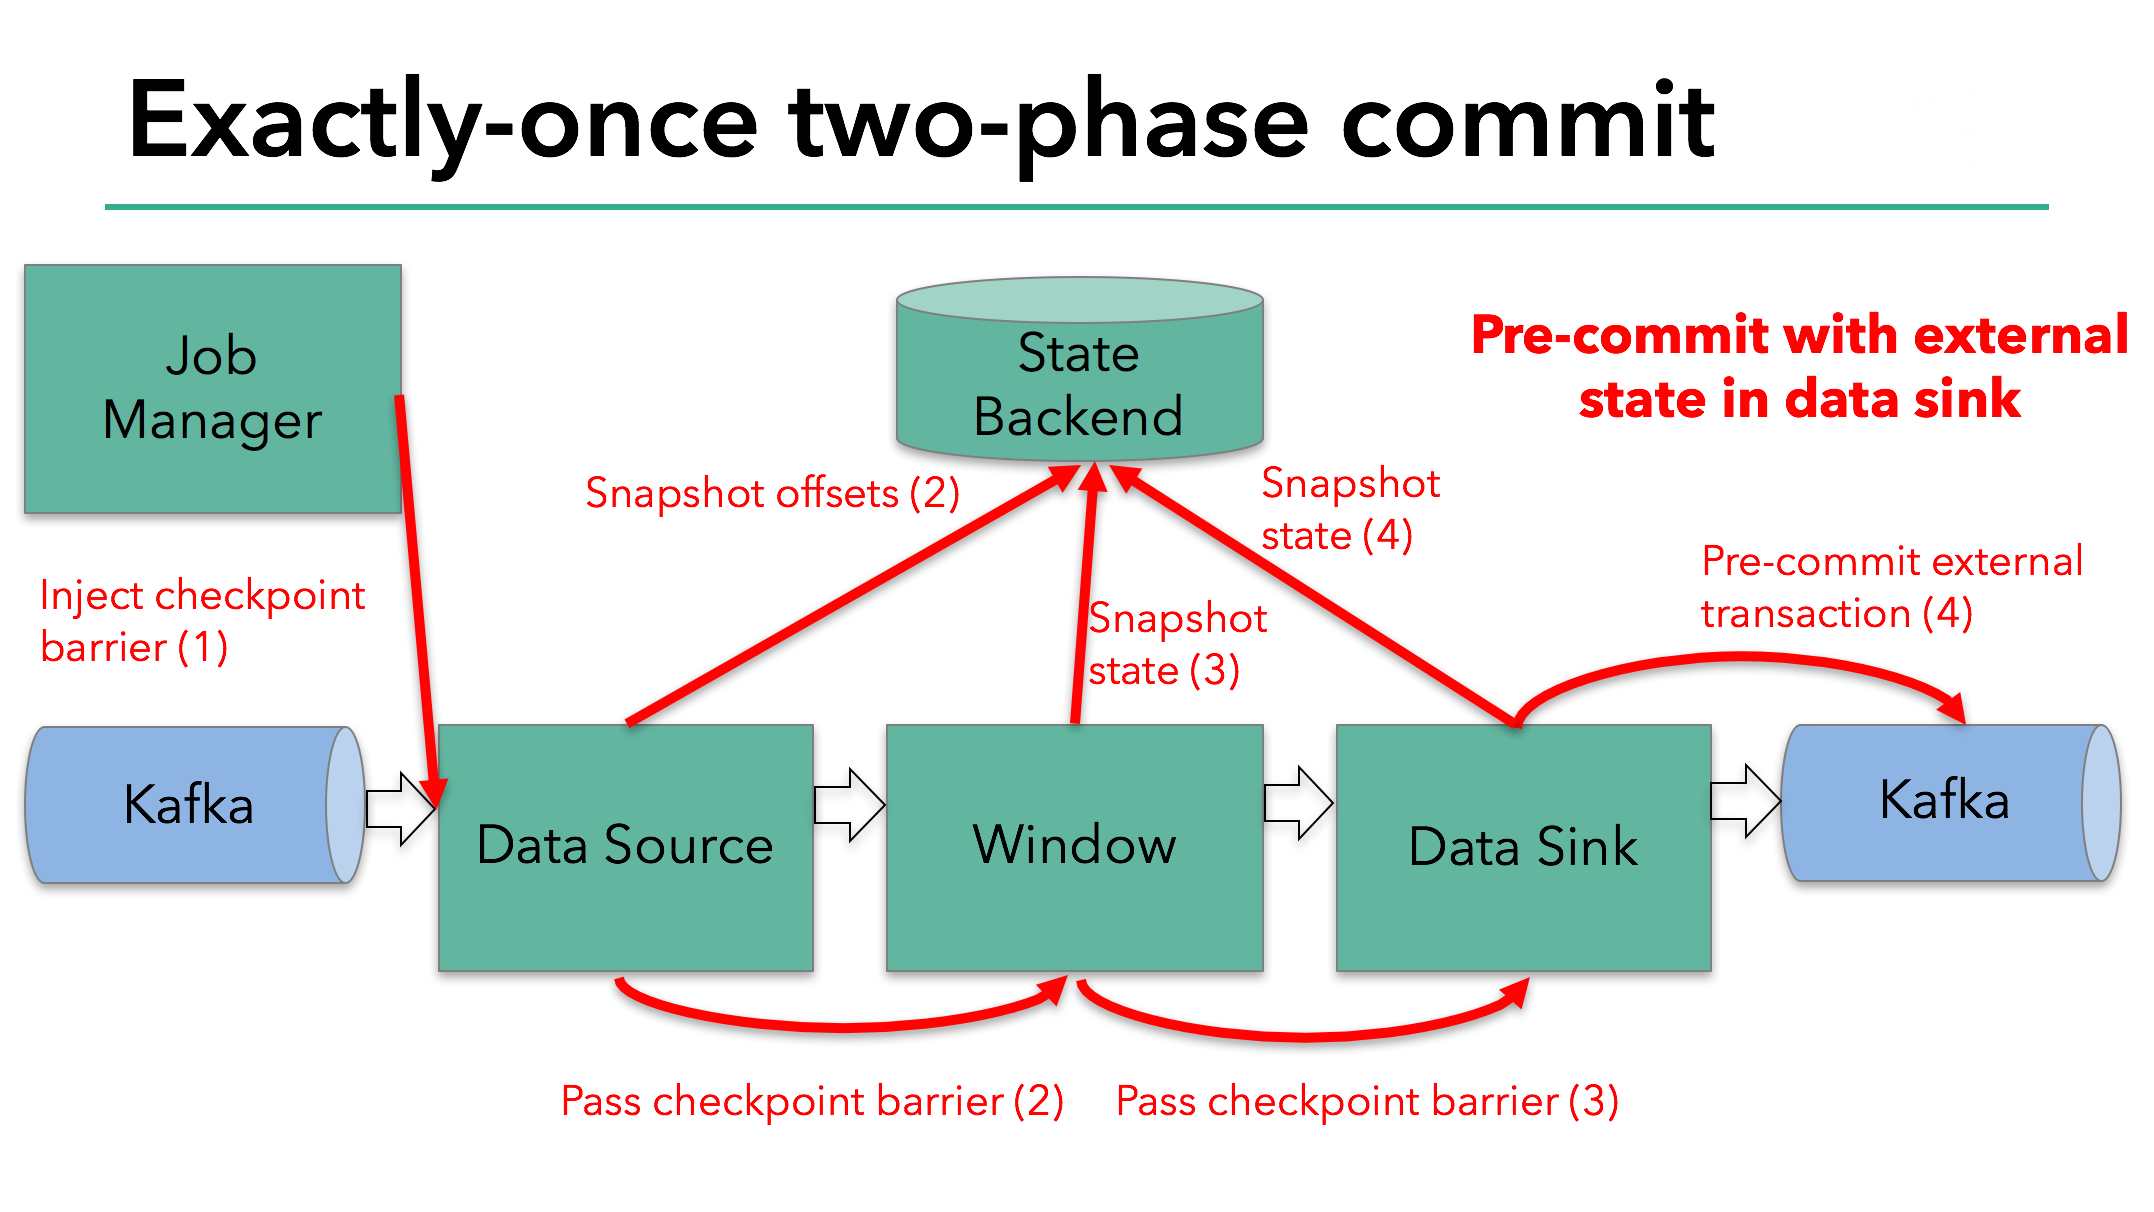
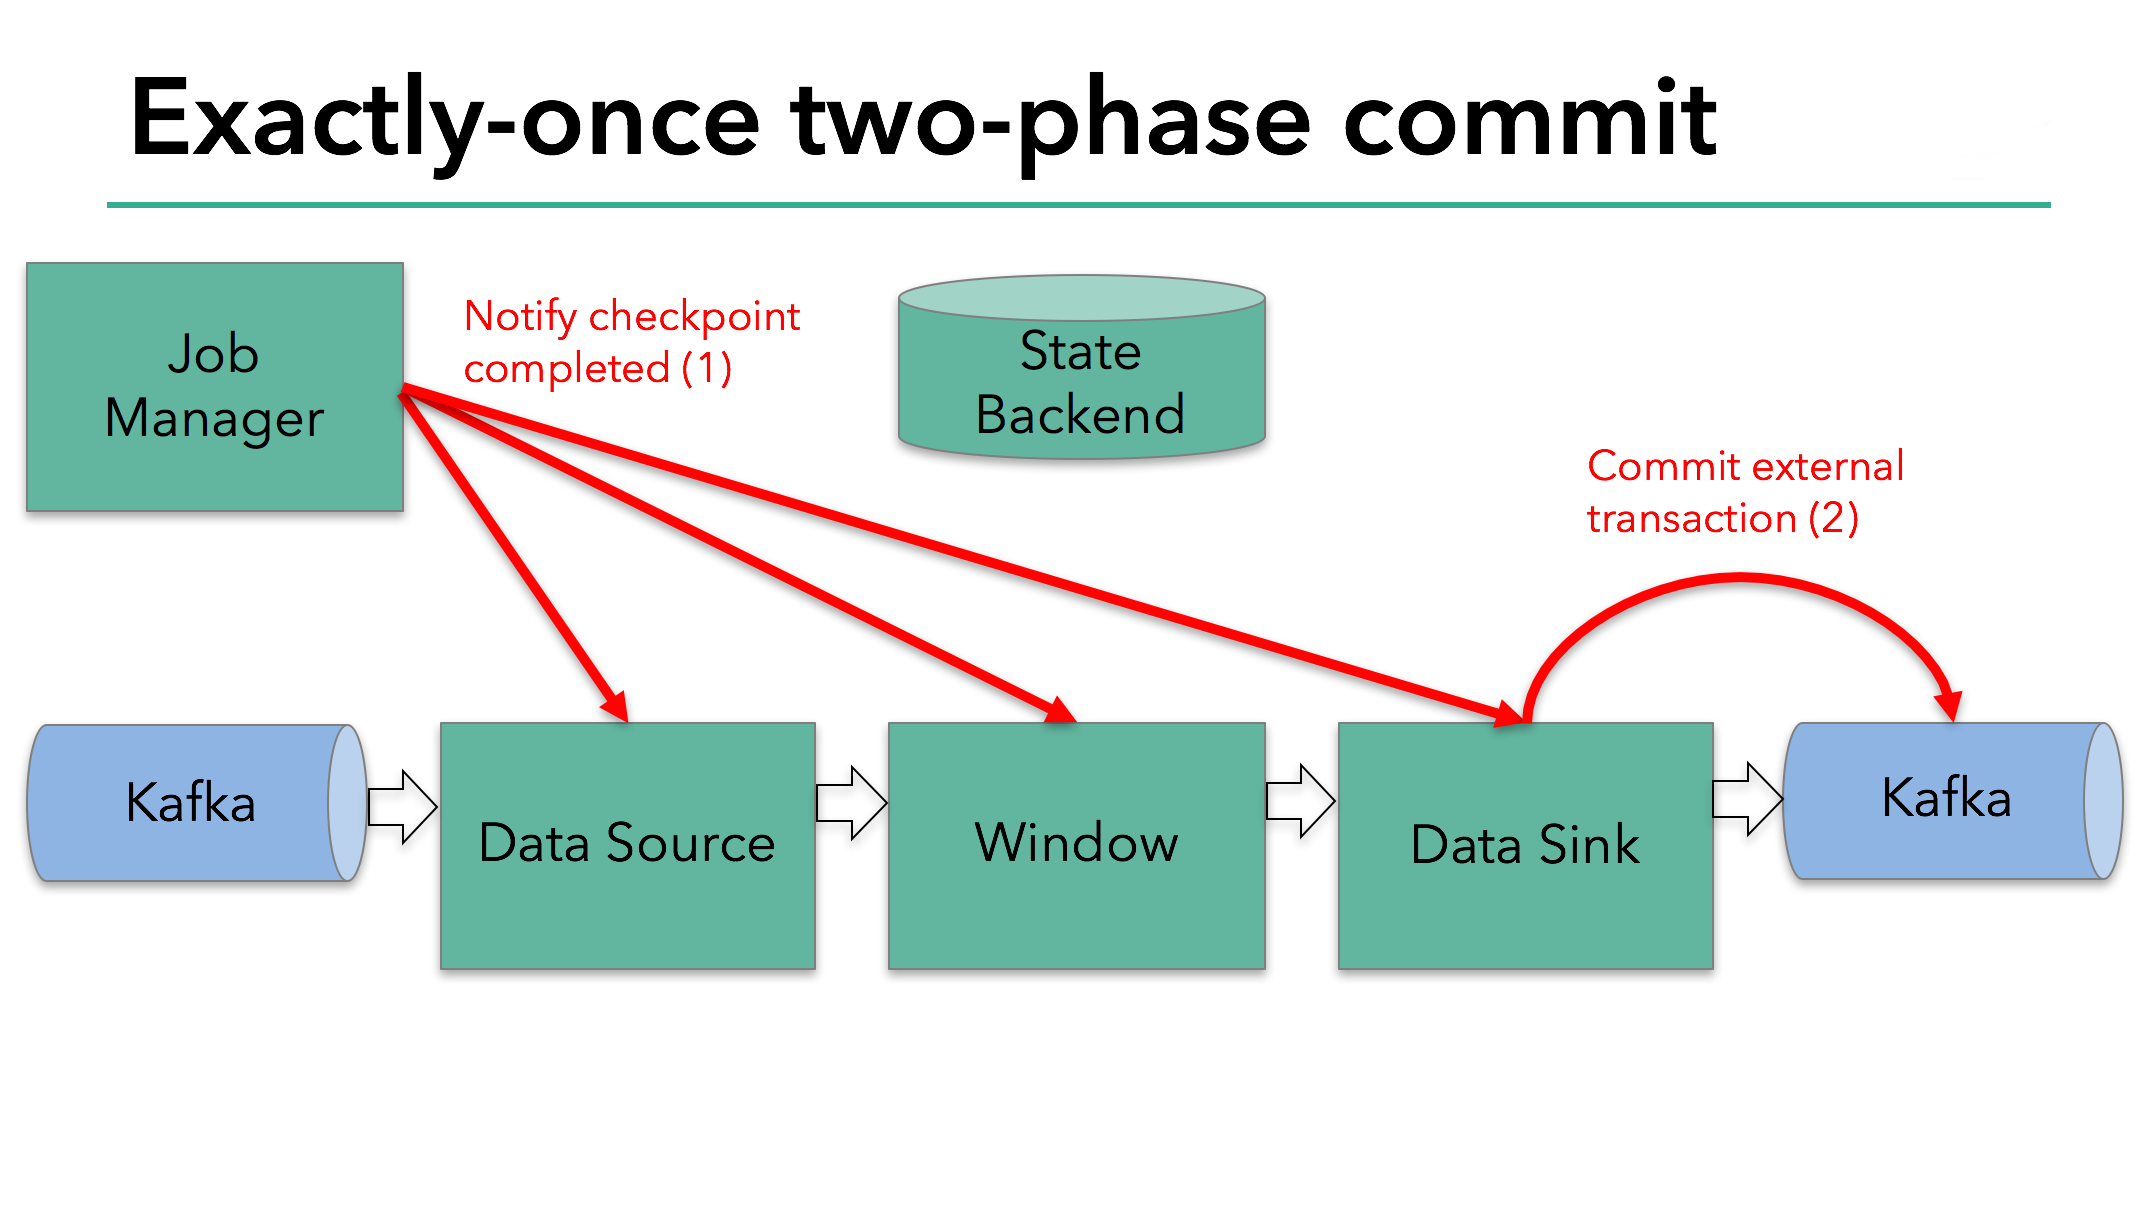
当整个程序的最后一个算子sink都收到了这个barrier,也就意味着这个barrier和上个barrier之间所夹杂的这批元素已经全部落袋为安。这时,最后一个算子通知JobManager整个流程已经完成,而JobManager随后发出通知,要求所有算子删除本次快照内容,以完成清理。这整个部分,就是Flink的 两阶段提交的checkpoint过程 ,如下面四幅图所示:
总之,通过这种方式,flink实现了我们前面提到的六项对流处理框架的要求:exactly-once、低延迟、高吞吐、易用的模型、方便的恢复机制。
最后,贴一个美团做的flink与storm的性能对比: flink与storm的性能对比
checkpoint的生命周期
接下来,我们结合源码来看看flink的checkpoint到底是如何实现其生命周期的:
由于flink提供的SocketSource并不支持checkpoint,所以这里我以
FlinkKafkaConsumer010作为sourceFunction。
触发checkpoint
要完成一次checkpoint,第一步必然是发起checkpoint请求。那么,这个请求是哪里发出的,怎么发出的,又由谁控制呢?
还记得如果我们要设置checkpoint的话,需要指定checkpoint间隔吧?既然是一个指定间隔触发的功能,那应该会有类似于Scheduler的东西存在,flink里,这个负责触发checkpoint的类是 CheckpointCoordinator 。
flink在提交job时,会启动这个类的 startCheckpointScheduler 方法,如下所示
1 | public void startCheckpointScheduler() { |
启动之后,就会以设定好的频率调用 triggerCheckPoint() 方法。这个方法太长,我大概说一下都做了什么:
- 检查符合触发checkpoint的条件,例如如果禁止了周期性的checkpoint,尚未达到触发checkpoint的最小间隔等等,就直接return
- 检查是否所有需要checkpoint和需要响应checkpoint的ACK(ack涉及到checkpoint的两阶段提交,后面会讲)的task都处于running状态,否则return
- 如果都符合,那么执行
checkpointID = checkpointIdCounter.getAndIncrement();以生成一个新的id,然后生成一个PendingCheckpoint。PendingCheckpoint是一个启动了的checkpoint,但是还没有被确认。等到所有的task都确认了本次checkpoint,那么这个checkpoint对象将转化为一个CompletedCheckpoint。 - 定义一个超时callback,如果checkpoint执行了很久还没完成,就把它取消
- 触发MasterHooks,用户可以定义一些额外的操作,用以增强checkpoint的功能(如准备和清理外部资源)
- 接下来是核心逻辑:
1 | // send the messages to the tasks that trigger their checkpoint |
这里是调用了Execution的triggerCheckpoint方法,一个execution就是一个executionVertex的实际执行者。我们看一下这个方法:
1 | public void triggerCheckpoint(long checkpointId, long timestamp, CheckpointOptions checkpointOptions) { |
再往下跟就进入了 Task 类的范畴,我们将在下一小节进行解读。本小节主要讲了 CheckpointCoordinator 类是如何触发一次checkpoint,从其名字也可以看出来其功能:检查点协调器。
Task层面checkpoint的准备工作
先说Task类中的部分,该类创建了一个 CheckpointMetaData 的对象,并且生成了一个Runable匿名类用于执行checkpoint,然后以异步的方式触发了该Runable:
1 | public void triggerCheckpointBarrier( |
上面代码里的invokable事实上就是我们的StreamTask了。Task类实际上是将checkpoint委托给了更具体的类去执行,而StreamTask也将委托给更具体的类,直到业务代码。
StreamTask是这样实现的:
- 如果task还在运行,那就可以进行checkpoint。方法是先向下游所有出口广播一个Barrier,然后触发本task的State保存。
- 如果task结束了,那我们就要通知下游取消本次checkpoint,方法是发送一个CancelCheckpointMarker,这是类似于Barrier的另一种消息。
- 注意,从这里开始,整个执行链路上开始出现Barrier,可以和前面讲Fault Tolerant原理的地方结合看一下。
1 | private boolean performCheckpoint( |
完成 broadcastCheckpointBarrier 方法后,在 checkpointState() 方法中,StreamTask还做了很多别的工作:
1 | public void executeCheckpointing() throws Exception { |
说到checkpoint,我们印象里最直观的感受肯定是我们的一些做聚合的操作符的状态保存,比如sum的和以及count的值等等。这些内容就是StreamOperator部分将要触发保存的内容。可以看到,除了我们直观的这些操作符的状态保存外,flink的checkpoint做了大量的其他工作。
接下来,我们就把目光转向操作符的checkpoint机制。
操作符的状态保存及barrier传递
第四章时,我们已经了解了StreamOperator的类关系,这里,我们就直接接着上一节的 checkpointStreamOperator(op) 方法往下讲。
顺便,前面也提到了,在进行checkpoint之前,operator初始化时,会执行一个 initializeState 方法,在该方法中,如果task是从失败中恢复的话,其保存的state也会被restore进来。
传递barrier是在进行本operator的statesnapshot之前完成的,我们先来看看其逻辑,其实和传递一条数据是类似的,就是生成一个 CheckpointBarrier 对象,然后向每个streamOutput写进去:
1 | public void broadcastCheckpointBarrier(long id, long timestamp, CheckpointOptions checkpointOptions) throws IOException { |
下游的operator接收到本barrier,就会触发其自身的checkpoint。
StreamTask在执行完broadcastCheckpointBarrier之后,
我们当前的wordcount程序里有两个operator chain,分别是:
- kafka source -> flatmap
- keyed aggregation -> sink
我们就按这个顺序来捋一下checkpoint的过程。
1.kafka source的checkpoint过程
1 | public final void snapshotState(FunctionSnapshotContext context) throws Exception { |
kafka的snapshot逻辑就是记录一下当前消费的offsets,然后做成tuple(partitiion,offset)放进一个 StateBackend 里。StateBackend是flink抽象出来的一个用于保存状态的接口。
2.FlatMap算子的checkpoint过程
没什么可说的,就是调用了snapshotState()方法而已。
3.本operator chain的state保存过程
细心的同学应该注意到了,各个算子的snapshot方法只把自己的状态保存到了StateBackend里,没有写入的持久化操作。这部分操作被放到了 AbstractStreamOperator 中,由flink统一负责持久化。其实不需要看源码我们也能想出来,持久化无非就是把这些数据用一个流写到磁盘或者别的地方,接下来我们来看看是不是这样:
1 | //还是AbstractStreamOperator.java的snapshotState方法 |
那么这个operatorStateBackend是怎么保存状态的呢?
- 首先把各个算子的state做了一份深拷贝;
- 然后以异步的方式执行了一个内部类的runnable,该内部类的run方法实现了一个模版方法,首先打开stream,然后写入数据,然后再关闭stream。
我们来看看这个写入数据的方法:
1 | public SnapshotResult<OperatorStateHandle> performOperation() throws Exception { |
注释写的很清楚,我就不多说了。
4.后继operatorChain的checkpoint过程
前面说到,在flink的流中,barrier流过时会触发checkpoint。在上面第1步中,上游节点已经发出了Barrier,所以在我们的keyed aggregation -> sink 这个operatorchain中,我们将首先捕获这个barrier。
捕获barrier的过程其实就是处理input数据的过程,对应着 StreamInputProcessor.processInput() 方法,该方法我们在第四章已经讲过,这里我们简单回顾一下:
1 | //每个元素都会触发这一段逻辑,如果下一个数据是buffer,则从外围的while循环里进入处理用户数据的逻辑;这个方法里默默的处理了barrier的逻辑 |
处理barrier的过程在这段代码里没有体现,因为被包含在了 getNextNonBlocked() 方法中,我们看下这个方法的核心逻辑:
1 | //BarrierBuffer.getNextNonBlocked方法 |
先提一嘴,大家还记得之前的部分也提到过CheckpointMarker吧,这里正好也对上了。
处理barrier也是个麻烦事,大家回想一下5.1节提到的屏障的原理图,一个opertor必须收到从每个inputchannel发过来的同一序号的barrier之后才能发起本节点的checkpoint,如果有的channel的数据处理的快了,那该barrier后的数据还需要缓存起来,如果有的inputchannel被关闭了,那它就不会再发送barrier过来了:
1 | private void processBarrier(CheckpointBarrier receivedBarrier, int channelIndex) throws Exception { |
总之,当收到全部的barrier之后,就会触发 notifyCheckpoint() ,该方法又会调用StreamTask的 triggerCheckpoint ,和之前的operator是一样的。
如果还有后续的operator的话,就是完全相同的循环,不再赘述。
5.报告完成checkpoint事件
当一个operator保存完checkpoint数据后,就会启动一个异步对象 AsyncCheckpointRunnable ,用以报告该检查点已完成,其具体逻辑在reportCompletedSnapshotStates中。这个方法把任务又最终委托给了 RpcCheckpointResponder 这个类:
1 | checkpointResponder.acknowledgeCheckpoint( |
从这个类也可以看出来,它的逻辑是通过rpc的方式远程调JobManager的相关方法完成报告事件,底层也是通过akka实现的。
那么,谁响应了这个rpc调用呢?是该任务的JobMaster。
1 | //JobMaster.java |
JobMaster反手就是一巴掌就把任务又rpc给了 CheckpointCoordinator.receiveAcknowledgeMessage() 方法。
之前提到,coordinator在触发checkpoint时,生成了一个 PendingCheckpoint ,保存了所有operator的id。
当PendingCheckpoint收到一个operator的完成checkpoint的消息时,它就把这个operator从未完成checkpoint的节点集合移动到已完成的集合。当所有的operator都报告完成了checkpoint时,CheckpointCoordinator会触发 completePendingCheckpoint() 方法,该方法做了以下事情:
- 把pendinCgCheckpoint转换为CompletedCheckpoint
- 把CompletedCheckpoint加入已完成的检查点集合,并从未完成检查点集合删除该检查点
- 再度向各个operator发出rpc,通知该检查点已完成
本文里,收到这个远程调用的就是那两个operator chain,我们来看看其逻辑:
1 | public void notifyCheckpointComplete(long checkpointId) throws Exception { |
再接下来无非就是层层通知对应的算子做出响应罢了。
至此,flink的两阶段提交的checkpoint逻辑全部完成。
承载checkpoint数据的抽象:State & StateBackend
State是快照数据的载体,StateBackend是快照如何被保存的抽象。
State分为 KeyedState和OperatorState,从名字就可以看出来分别对应着keyedStream和其他的oeprator。从State由谁管理上,也可以区分为raw state和Managed state。Flink管理的就是Managed state,用户自己管理的就是raw state。Managed State又分为ValueState、ListState、ReducingState、AggregatingState、FoldingState、MapState这么几种,看名字知用途。
StateBackend目前提供了三个backend,MemoryStateBackend,FsStateBackend,RocksDBStateBackend,都是看名字知用途系列。
State接口、StateBackend接口及其实现都比较简单,代码就不贴了, 尤其State本质上就是一层容器封装。
贴个别人写的状态管理的文章吧: 详解Flink中的状态管理
数据流转——Flink的数据抽象及数据交换过程
本章打算讲一下flink底层是如何定义和在操作符之间传递数据的。
flink的数据抽象
MemorySegment
Flink作为一个高效的流框架,为了避免JVM的固有缺陷(java对象存储密度低,FGC影响吞吐和响应等),必然走上自主管理内存的道路。
这个 MemorySegment 就是Flink的内存抽象。默认情况下,一个MemorySegment可以被看做是一个32kb大的内存块的抽象。这块内存既可以是JVM里的一个byte[],也可以是堆外内存(DirectByteBuffer)。
如果说byte[]数组和direct memory是最底层的存储,那么memorysegment就是在其上覆盖的一层统一抽象。它定义了一系列抽象方法,用于控制和底层内存的交互,如:
1 | public abstract class MemorySegment { |
我们可以看到,它在提供了诸多直接操作内存的方法外,还提供了一个 wrap() 方法,将自己包装成一个ByteBuffer,我们待会儿讲这个ByteBuffer。
Flink为MemorySegment提供了两个实现类: HeapMemorySegment 和 HybridMemorySegment 。他们的区别在于前者只能分配堆内存,而后者能用来分配堆内和堆外内存。事实上,Flink框架里,只使用了后者。这是为什么呢?
如果HybridMemorySegment只能用于分配堆外内存的话,似乎更合常理。但是在JVM的世界中,如果一个方法是一个虚方法,那么每次调用时,JVM都要花时间去确定调用的到底是哪个子类实现的该虚方法(方法重写机制,不明白的去看JVM的invokeVirtual指令),也就意味着每次都要去翻方法表;而如果该方法虽然是个虚方法,但实际上整个JVM里只有一个实现(就是说只加载了一个子类进来),那么JVM会很聪明的把它去虚化处理,这样就不用每次调用方法时去找方法表了,能够大大提升性能。但是只分配堆内或者堆外内存不能满足我们的需要,所以就出现了HybridMemorySegment同时可以分配两种内存的设计。
我们可以看看HybridMemorySegment的构造代码:
1 | HybridMemorySegment(ByteBuffer buffer, Object owner) { |
其中,第一个构造函数的 checkBufferAndGetAddress() 方法能够得到direct buffer的内存地址,因此可以操作堆外内存。
ByteBuffer与NetworkBufferPool
在 MemorySegment 这个抽象之上,Flink在数据从operator内的数据对象在向TaskManager上转移,预备被发给下个节点的过程中,使用的抽象或者说内存对象是 Buffer 。
注意 ,这个Buffer是个flink接口,不是java.nio提供的那个Buffer抽象类。Flink在这一层面同时使用了这两个同名概念,用来存储对象,直接看代码时到处都是各种xxxBuffer很容易混淆:
- java提供的那个Buffer抽象类在这一层主要用于构建
HeapByteBuffer,这个主要是当数据从jvm里的一个对象被序列化成字节数组时用的; - Flink的这个Buffer接口主要是一种flink层面用于传输数据和事件的统一抽象,其实现类是
NetworkBuffer,是对MemorySegment的包装。Flink在各个TaskManager之间传递数据时,使用的是这一层的抽象。
因为Buffer的底层是MemorySegment,这可能不是JVM所管理的,所以为了知道什么时候一个Buffer用完了可以回收,Flink引入了引用计数的概念,当确认这个buffer没有人引用,就可以回收这一片MemorySegment用于别的地方了(JVM的垃圾回收为啥不用引用计数?读者思考一下):
1 | public abstract class AbstractReferenceCountedByteBuf extends AbstractByteBuf { |
为了方便管理 NetworkBuffer ,Flink提供了 BufferPoolFactory ,并且提供了唯一实现 NetworkBufferPool ,这是个工厂模式的应用。
NetworkBufferPool在每个TaskManager上只有一个,负责所有子task的内存管理。其实例化时就会尝试获取所有可由它管理的内存(对于堆内存来说,直接获取所有内存并放入老年代,并令用户对象只在新生代存活,可以极大程度的减少Full GC),我们看看其构造方法:
1 | public NetworkBufferPool(int numberOfSegmentsToAllocate, int segmentSize) { |
由于NetworkBufferPool只是个工厂,实际的内存池是 LocalBufferPool 。每个TaskManager都只有一个NetworkBufferPool工厂,但是上面运行的每个task都要有一个和其他task隔离的LocalBufferPool池,这从逻辑上很好理解。另外,NetworkBufferPool会计算自己所拥有的所有内存分片数,在分配新的内存池时对每个内存池应该占有的内存分片数重分配,步骤是:
- 首先,从整个工厂管理的内存片中拿出所有的内存池所需要的最少Buffer数目总和
- 如果正好分配完,就结束
- 其次,把所有的剩下的没分配的内存片,按照每个LocalBufferPool内存池的剩余想要容量大小进行按比例分配
- 剩余想要容量大小是这么个东西:如果该内存池至少需要3个buffer,最大需要10个buffer,那么它的剩余想要容量就是7
实现代码如下:
1 | private void redistributeBuffers() throws IOException { |
接下来说说这个 LocalBufferPool 内存池。
LocalBufferPool的逻辑想想无非是增删改查,值得说的是其fields:
1 | /** 该内存池需要的最少内存片数目*/ |
承接NetworkBufferPool的重分配方法,我们来看看LocalBufferPool的 setNumBuffers() 方法,代码很短,逻辑也相当简单,就不展开说了:
1 | public void setNumBuffers(int numBuffers) throws IOException { |
RecordWriter与Record
我们接着往高层抽象走,刚刚提到了最底层内存抽象是MemorySegment,用于数据传输的是Buffer,那么,承上启下对接从Java对象转为Buffer的中间对象是什么呢?是 StreamRecord 。
从 StreamRecord<T> 这个类名字就可以看出来,这个类就是个wrap,里面保存了原始的Java对象。另外,StreamRecord还保存了一个timestamp。
那么这个对象是怎么变成LocalBufferPool内存池里的一个大号字节数组的呢?借助了 StreamWriter 这个类。
我们直接来看把数据序列化交出去的方法:
1 | private void sendToTarget(T record, int targetChannel) throws IOException, InterruptedException { |
先说最后一行,如果配置为flushAlways,那么会立刻把元素发送出去,但是这样吞吐量会下降;Flink的默认设置其实也不是一个元素一个元素的发送,是单独起了一个线程,每隔固定时间flush一次所有channel,较真起来也算是mini batch了。
再说序列化那一句:SerializationResult result = serializer.addRecord(record); 。在这行代码中,Flink把对象调用该对象所属的序列化器序列化为字节数组。
数据流转过程
上一节讲了各层数据的抽象,这一节讲讲数据在各个task之间exchange的过程。
整体过程
看这张图:
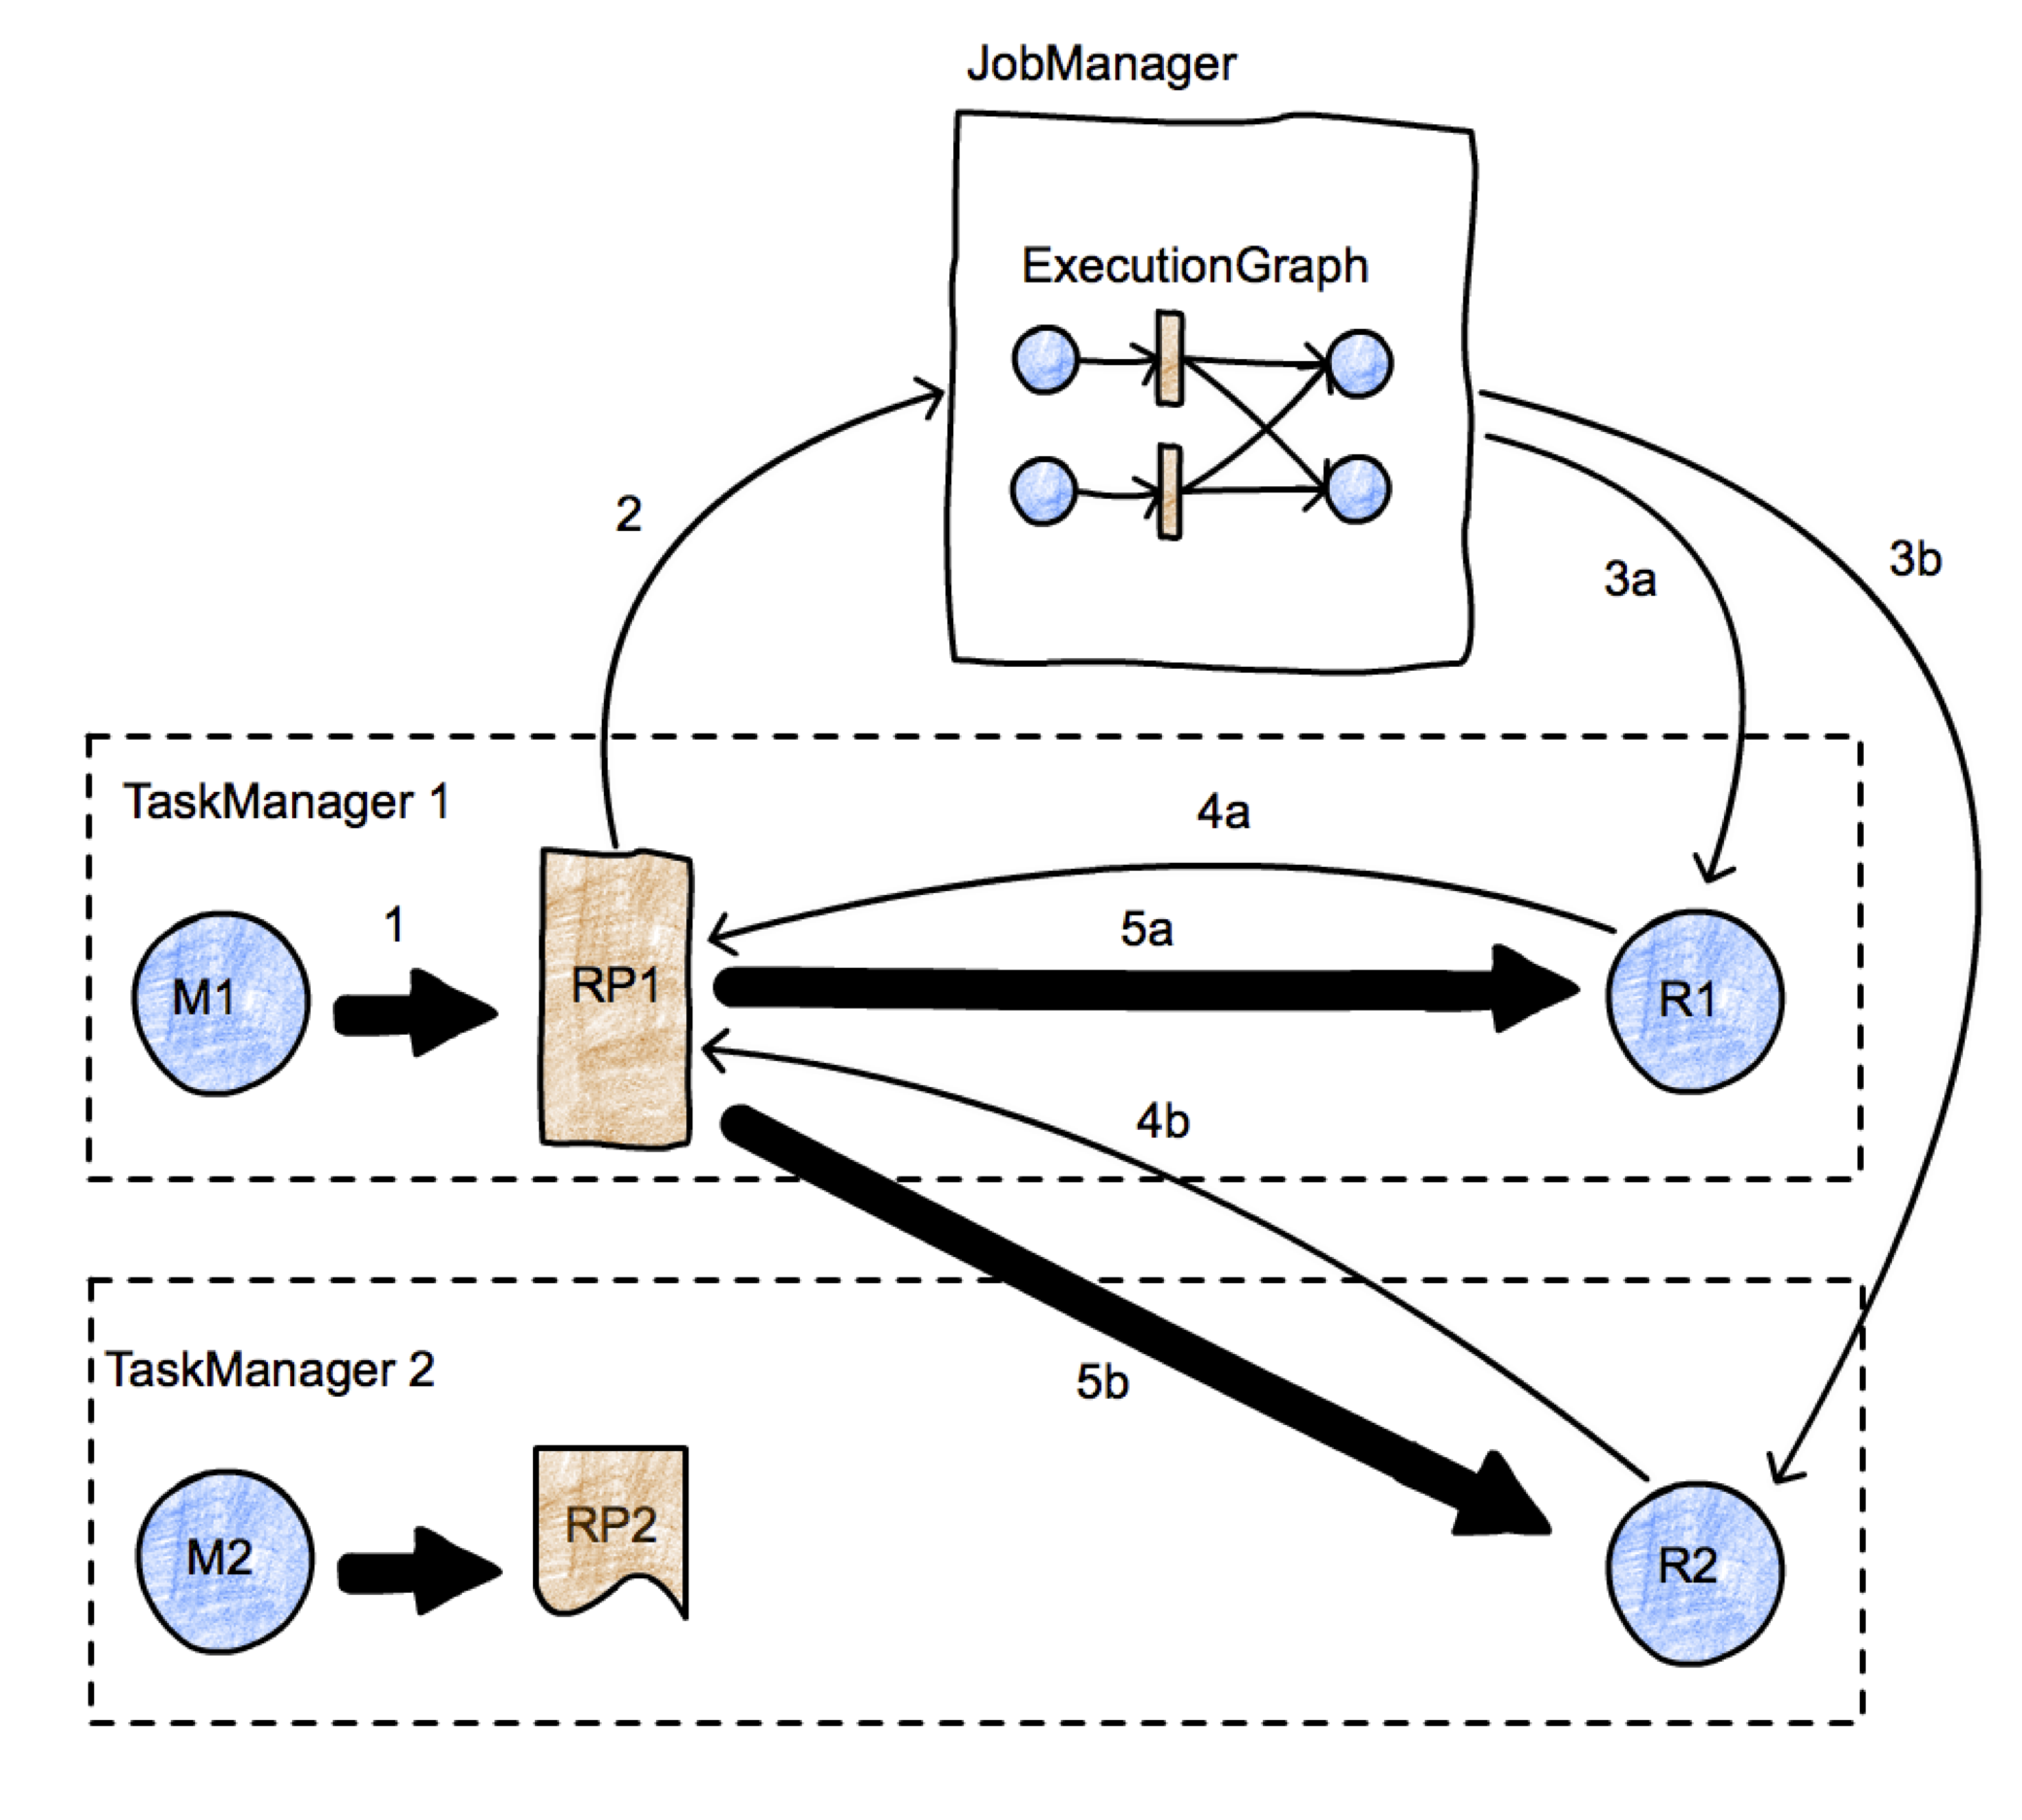
- 第一步必然是准备一个ResultPartition;
- 通知JobMaster;
- JobMaster通知下游节点;如果下游节点尚未部署,则部署之;
- 下游节点向上游请求数据
- 开始传输数据
数据跨task传递
本节讲一下算子之间具体的数据传输过程。也先上一张图:
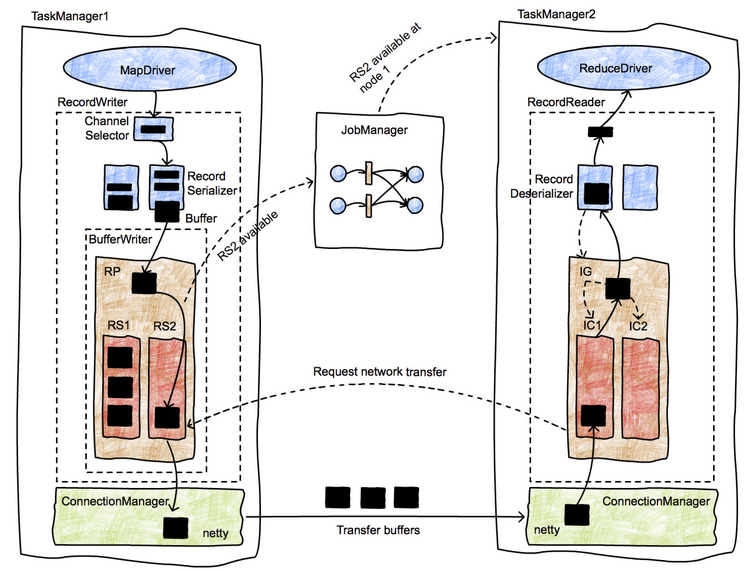
数据在task之间传递有如下几步:
- 数据在本operator处理完后,交给
RecordWriter。每条记录都要选择一个下游节点,所以要经过ChannelSelector。 - 每个channel都有一个serializer(我认为这应该是为了避免多线程写的麻烦),把这条Record序列化为ByteBuffer
- 接下来数据被写入ResultPartition下的各个subPartition里,此时该数据已经存入DirectBuffer(MemorySegment)
- 单独的线程控制数据的flush速度,一旦触发flush,则通过Netty的nio通道向对端写入
- 对端的netty client接收到数据,decode出来,把数据拷贝到buffer里,然后通知
InputChannel - 有可用的数据时,下游算子从阻塞醒来,从InputChannel取出buffer,再解序列化成record,交给算子执行用户代码
数据在不同机器的算子之间传递的步骤就是以上这些。
了解了步骤之后,再来看一下部分关键代码:
首先是把数据交给recordwriter。
1 | //RecordWriterOutput.java |
然后recordwriter把数据发送到对应的通道。
1 | //RecordWriter.java |
接下来是把数据推给底层设施(netty)的过程:
1 | //ResultPartition.java |
netty相关的部分:
1 | //AbstractChannelHandlerContext.java |
最后真实的写入:
1 | //PartittionRequesetQueue.java |
上面这段代码里第二个方法中调用的 writeAndFlush(msg) 就是真正往netty的nio通道里写入的地方了。在这里,写入的是一个RemoteInputChannel,对应的就是下游节点的InputGate的channels。
有写就有读,nio通道的另一端需要读入buffer,代码如下:
1 | //CreditBasedPartitionRequestClientHandler.java |
插一句,Flink其实做阻塞和获取数据的方式非常自然,利用了生产者和消费者模型,当获取不到数据时,消费者自然阻塞;当数据被加入队列,消费者被notify。Flink的背压机制也是借此实现。
然后在这里又反序列化成 StreamRecord :
1 | //StreamElementSerializer.java |
然后再次在 StreamInputProcessor.processInput() 循环中得到处理。
至此,数据在跨jvm的节点之间的流转过程就讲完了。
Credit漫谈
在看上一部分的代码时,有一个小细节不知道读者有没有注意到,我们的数据发送端的代码叫做 PartittionRequesetQueue.java ,而我们的接收端却起了一个完全不相干的名字: CreditBasedPartitionRequestClientHandler.java 。为什么前面加了CreditBased的前缀呢?
背压问题
在流模型中,我们期待数据是像水流一样平滑的流过我们的引擎,但现实生活不会这么美好。数据的上游可能因为各种原因数据量暴增,远远超出了下游的瞬时处理能力(回忆一下98年大洪水),导致系统崩溃。
那么框架应该怎么应对呢?和人类处理自然灾害的方式类似,我们修建了三峡大坝,当洪水来临时把大量的水囤积在大坝里;对于Flink来说,就是在数据的接收端和发送端放置了缓存池,用以缓冲数据,并且设置闸门阻止数据向下流。
那么Flink又是如何处理背压的呢?答案也是靠这些缓冲池。
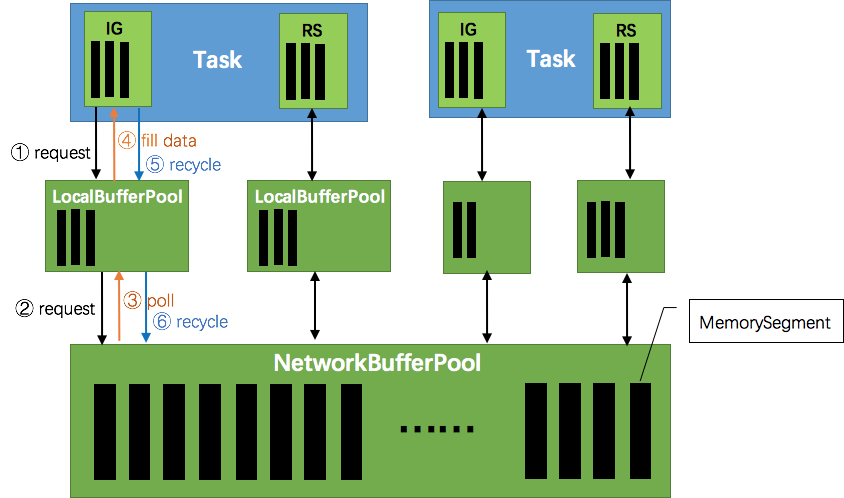
这张图说明了Flink在生产和消费数据时的大致情况。 ResultPartition 和 InputGate 在输出和输入数据时,都要向 NetworkBufferPool 申请一块 MemorySegment 作为缓存池。
接下来的情况和生产者消费者很类似。当数据发送太多,下游处理不过来了,那么首先InputChannel会被填满,然后是InputChannel能申请到的内存达到最大,于是下游停止读取数据,上游负责发送数据的nettyServer会得到响应,停止从ResultSubPartition读取缓存,那么ResultPartition很快也将存满数据不能被消费,从而生产数据的逻辑被阻塞在获取新buffer上,非常自然地形成背压的效果。
Flink自己做了个试验用以说明这个机制的效果:

我们首先设置生产者的发送速度为60%,然后下游的算子以同样的速度处理数据。然后我们将下游算子的处理速度降低到30%,可以看到上游的生产者的数据产生曲线几乎与消费者同步下滑。而后当我们解除限速,整个流的速度立刻提高到了100%。
使用Credit实现ATM网络流控
上文已经提到,对于流量控制,一个朴素的思路就是在长江上建三峡链路上建立一个拦截的dam,如下图所示:
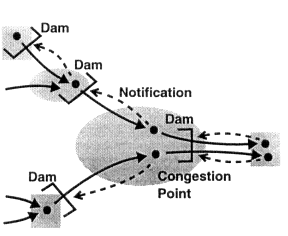
基于Credit的流控就是这样一种建立在信用(消费数据的能力)上的,面向每个虚链路(而非端到端的)流模型,如下图所示:
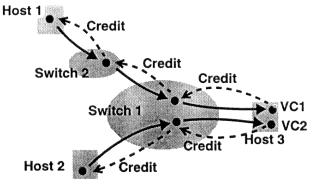
首先,下游会向上游发送一条credit message,用以通知其目前的信用(可联想信用卡的可用额度),然后上游会根据这个信用消息来决定向下游发送多少数据。当上游把数据发送给下游时,它就从下游的信用卡上划走相应的额度(credit balance):
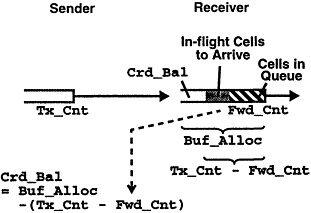
下游总共获得的credit数目是Buf_Alloc,已经消费的数据是Fwd_Cnt,上游发送出来的数据是Tx_Cnt,那么剩下的那部分就是Crd_Bal:
Crd_Bal = Buf_Alloc - ( Tx_Cnt - Fwd_Cnt )
上面这个式子应该很好理解。
可以看到,Credit Based Flow Control的关键是buffer分配。这种分配可以在数据的发送端完成,也可以在接收端完成。对于下游可能有多个上游节点的情况(比如Flink),使用接收端的credit分配更加合理:
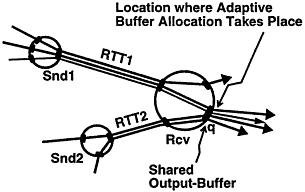
上图中,接收者可以观察到每个上游连接的带宽情况,而上游的节点Snd1却不可能轻易知道发往同一个下游节点的其他Snd2的带宽情况,从而如果在上游控制流量将会很困难,而在下游控制流量将会很方便。
因此,这就是为何Flink在接收端有一个基于Credit的Client,而不是在发送端有一个CreditServer的原因。
最后,再讲一下Credit的面向虚链路的流设计和端到端的流设计的区别:
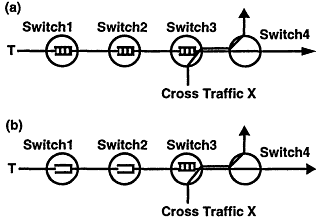
如上图所示,a是面向连接的流设计,b是端到端的流设计。其中,a的设计使得当下游节点3因某些情况必须缓存数据暂缓处理时,每个上游节点(1和2)都可以利用其缓存保存数据;而端到端的设计b里,只有节点3的缓存才可以用于保存数据(读者可以从如何实现上想想为什么)。
对流控制感兴趣的读者,可以看这篇文章: Traffic Management For High-Speed Networks 。
其他核心概念
截至第六章,和执行过程相关的部分就全部讲完,告一段落了。第七章主要讲一点杂七杂八的内容,有时间就不定期更新。
EventTime时间模型
flink有三种时间模型:ProcessingTime,EventTime和IngestionTime。
关于时间模型看这张图:
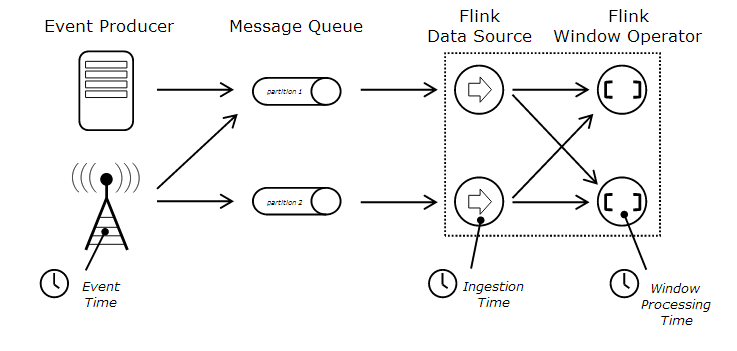
从这张图里可以很清楚的看到三种Time模型的区别。
- EventTime是数据被生产出来的时间,可以是比如传感器发出信号的时间等(此时数据还没有被传输给flink)。
- IngestionTime是数据进入flink的时间,也就是从Source进入flink流的时间(此时数据刚刚被传给flink)
- ProcessingTime是针对当前算子的系统时间,是指该数据已经进入某个operator时,operator所在系统的当前时间
例如,我在写这段话的时间是2018年5月13日03点47分,但是我引用的这张EventTime的图片,是2015年画出来的,那么这张图的EventTime是2015年,而ProcessingTime是现在。
Flink官网对于时间戳的解释非常详细: 点我
Flink对于EventTime模型的实现,依赖的是一种叫做watermark的对象。watermark是携带有时间戳的一个对象,会按照程序的要求被插入到数据流中,用以标志某个事件在该时间发生了。
我再做一点简短的说明,还是以官网的图为例:
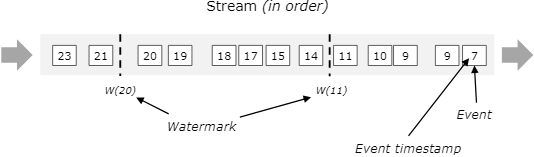
对于有序到来的数据,假设我们在timestamp为11的元素后加入一个watermark,时间记录为11,则下个元素收到该watermark时,认为所有早于11的元素均已到达。这是非常理想的情况。
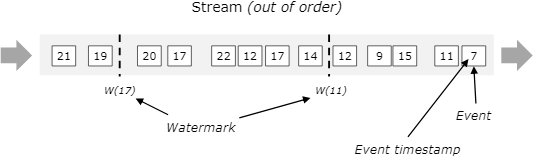
而在现实生活中,经常会遇到乱序的数据。这时,我们虽然在timestamp为7的元素后就收到了11,但是我们一直等到了收到元素12之后,才插入了watermark为11的元素。与上面的图相比,如果我们仍然在11后就插入11的watermark,那么元素9就会被丢弃,造成数据丢失。而我们在12之后插入watermark11,就保证了9仍然会被下一个operator处理。当然,我们不可能无限制的永远等待迟到元素,所以要在哪个元素后插入11需要根据实际场景权衡。
对于来自多个数据源的watermark,可以看这张图:
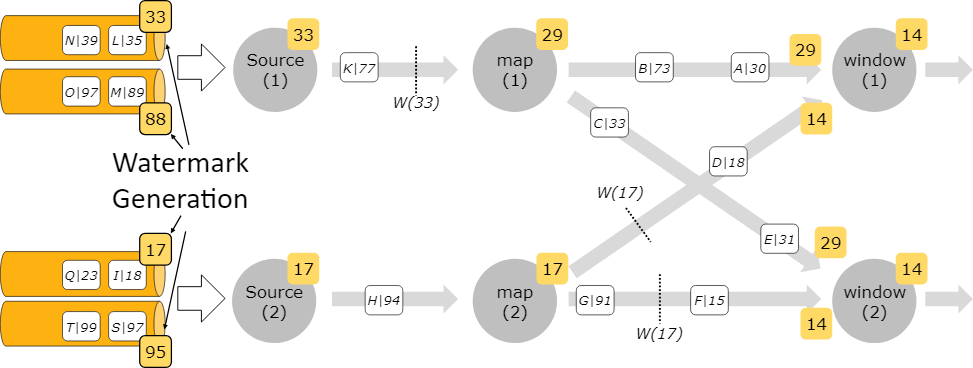
可以看到,当一个operator收到多个watermark时,它遵循最小原则(或者说最早),即算子的当前watermark是流经该算子的最小watermark,以容许来自不同的source的乱序数据到来。
关于事件时间模型,更多内容可以参考 Stream 101 和谷歌的这篇论文: Dataflow Model paper
FLIP-6 部署及处理模型演进
就在老白写这篇blog的时候,Flink发布了其1.5 RELEASE版本,号称实现了其部署及处理模型(也就是FLIP-6),所以打算简略地说一下FLIP-6的主要内容。
现有模型不足
1.5之前的Flink模型有很多不足,包括:
- 只能静态分配计算资源
- 在YARN上所有的资源分配都是一碗水端平的
- 与Docker/k8s的集成非常之蠢,颇有脱裤子放屁的神韵
- JobManager没有任务调度逻辑
- 任务在YARN上执行结束后web dashboard就不可用
- 集群的session模式和per job模式混淆难以理解
就我个人而言,我觉得Flink有一个这里完全没提到的不足才是最应该修改的:针对任务的完全的资源隔离。尤其是如果用Standalone集群,一个用户的task跑挂了TaskManager,然后拖垮了整个集群的情况简直不要太多。
核心变更
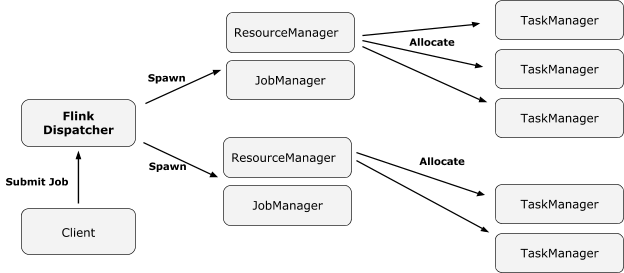
Single Job JobManager
最重要的变更是一个JobManager只处理一个job。当我们生成JobGraph时就顺便起一个JobManager,这显然更加自然。
ResourceManager
其职责包括获取新的TM和slot,通知失败,释放资源以及缓存TM以用于重用等。重要的是,这个组件要能做到挂掉时不要搞垮正在运行的好好的任务。其职责和与JobManager、TaskManager的交互图如下:
TaskManager
TM要与上面的两个组件交互。与JobManager交互时,要能提供slot,要能与所有给出slot的JM交互。丢失与JM的连接时要能试图把本TM上的slot的情况通告给新JM,如果这一步失败,就要能重新分配slot。
与ResourceManager交互时,要通知RM自己的资源和当前的Job分配情况,能按照RM的要求分配资源或者关闭自身。
JobManager Slot Pool
这个pool要持有所有分配给当前job的slot资源,并且能在RM挂掉的情况下管理当前已经持有的slot。
Dispatcher
需要一个Job的分发器的主要原因是在有的集群环境下我们可能需要一个统一的提交和监控点,以及替代之前的Standalone模式下的JobManager。将来对分发器的期望可能包括权限控制等。
Cluster Manager的架构
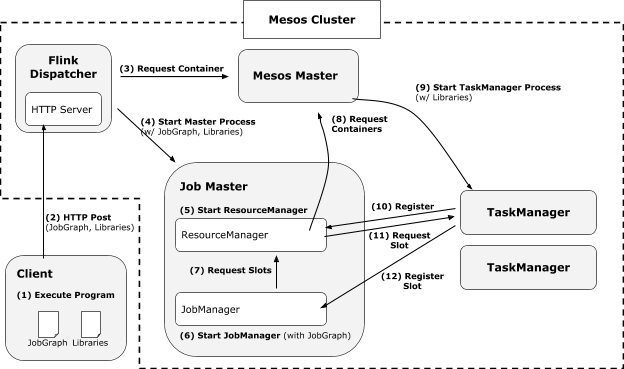
YARN
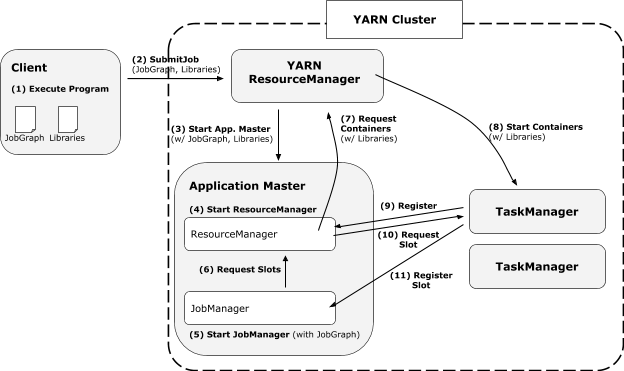
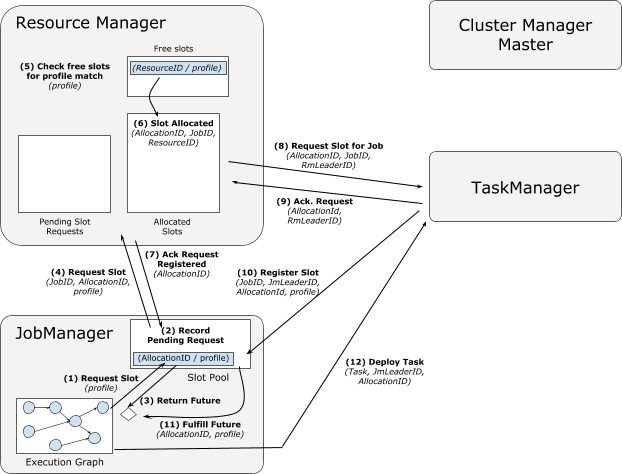
新的基于YARN的架构主要包括不再需要先在容器里启动集群,然后提交任务;用户代码不再使用动态ClassLoader加载;不用的资源可以释放;可以按需分配不同大小的容器等。其执行过程如下:
无Dispatcher时
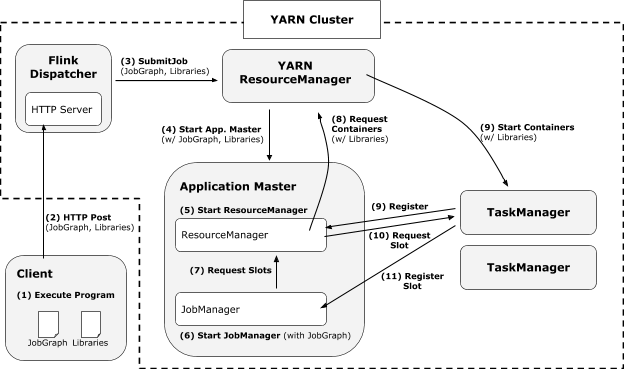
有Dispatcher时
Mesos
与基于YARN的模式很像,但是只有带Dispatcher模式,因为只有这样才能在Mesos集群里跑其RM。
Mesos的Fault Tolerance是类似这样的:
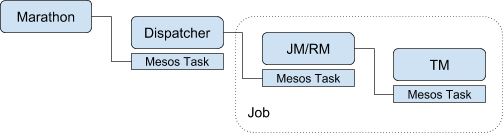
必须用类似Marathon之类的技术保证Dispatcher的HA。
Standalone
其实没啥可说的,把以前的JobManager的职责换成现在的Dispatcher就行了。
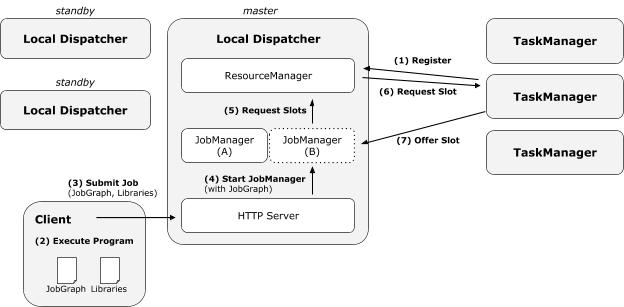
将来可能会实现一个类似于轻量级Yarn的模式。
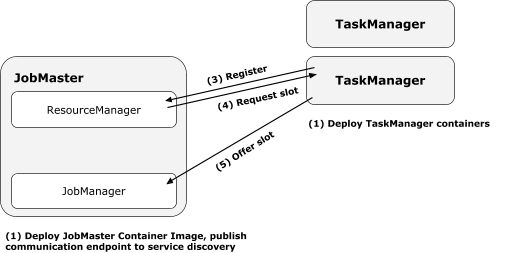
Docker/k8s
用户定义好容器,至少有一个是job specific的(不然怎么启动任务);还有用于启动TM的,可以不是job specific的。启动过程如下
组件设计及细节
分配slot相关细节
从新的TM取slot过程:
从Cached TM取slot过程:
失败处理
TM失败
TM失败时,RM要能检测到失败,更新自己的状态,发送消息给JM,重启一份TM;JM要能检测到失败,从状态移除失效slot,标记该TM的task为失败,并在没有足够slot继续任务时调整规模;TM自身则要能从Checkpoint恢复RM失败
此时TM要能检测到失败,并准备向新的RM注册自身,并且向新的RM传递自身的资源情况;JM要能检测到失败并且等待新的RM可用,重新请求需要的资源;丢失的数据要能从Container、TM等处恢复。JM失败
TM释放所有task,向新JM注册资源,并且如果不成功,就向RM报告这些资源可用于重分配;RM坐等;JM丢失的数据从持久化存储中获得,已完成的checkpoints从HA恢复,从最近的checkpoint重启task,并申请资源。JM & RM 失败
TM将在一段时间内试图把资源交给新上任的JM,如果失败,则把资源交给新的RMTM & RM失败
JM如果正在申请资源,则要等到新的RM启动后才能获得;JM可能需要调整其规模,因为损失了TM的slot。
后记
Flink是当前流处理领域的优秀框架,其设计思想和代码实现都蕴含着许多人的智慧结晶。这篇解读花了很多时间,篇幅也写了很长,也仍然不能能覆盖Flink的方方面面,也肯定有很多错误之处,欢迎大家批评指正!
本文转自:老白讲互联网